Installing Gitora Manually

We created a solid installer for Gitora which has a very high success rate. However, IT environment can be very complex and restrictive (and understandably so). So having an installer does not work for everyone and every organization.

Therefore, today we are making the Gitora 2.0 installation scripts available for download. Below are the steps you can follow to install Gitora 2.0 to your environment manually.

Installation of Middletier Components

  1. For Linux and Mac OS, install Git manually from https://git-scm.com/. For Windows, Git is already included to this setup.
  2. Move Gitora2 folder to the place you want to locate Gitora middle tier components.
    e.g /Users/username/
  3. For Windows, open fix_parameters_WINDOWS.bat to edit.
    For Mac OS, open fix_parameters_MAC.sh to edit.
    For Linux, open fix_parameters_LINUX.sh to edit.
  4. Set GITORA_ROOT parameter to the absolute path of the Gitora2 folder from step 1..
    e.g /Users/username/Gitora2
  5. Set GITORA_DATABASE_CONNECTION_STRING parameter to the correct jdbc connection string to your database.
    e.g jdbc:oracle:thin:@192.168.1.99:1521:orcl
  6. For Mac OS and Linux, set GIT_EXECUTABLE parameter to the path of git executable.
    e.g. /usr/bin/git
  7. Open command line terminal and run fix_parameters_WINDOWS.bat for Windows, fix_parameters_MAC.sh for MAC OS, fix_parameters_LINUX.sh for Linux.

Installation of Database Components

  1. Connect to the Oracle Database with the SYS user
  2. Run 01_SYS.sql
  3. Disconnect from SYS
  4. Connect to the database with the GITORA user
  5. Run 02_GITORA.sql
  6. Ensure that there are no invalid packages in GITORA schema.
  7. Create a row in table GITORA.T_TEMP_APPLICATION
  8. Copy the contents of Gitora.xml to this newly created row
  9. Issue a commit to save this row to the database.
  10. Run 03_GITORA.sql
  11. Disconnect from GITORA user
  12. Connect to the database with SYS user
  13. Open 04_SYS.sql and replace the two occurrences of @VERSIONCONTROL_HOST@ keyword with the IP address of your Gitora middle tier machine, where Gitora web server and middle tier components are installed. You need to ensure that your middle tier machine is accessible from database machine by checking network and firewall settings of both machines.
  14. For Windows, change the value of “folderSeparator” parameter from ‘/’ to ‘\’.
  15. Run 04_SYS.sql
  16. Disconnect from SYS.

Starting Up Gitora

  1. For Windows, run Gitora2/apache-tomcat-7.0.69/bin/startup.bat.
    For Mac OS and Linux, run Gitora2/apache-tomcat-7.0.69/bin/startup.sh
  2. Open your browser and type http://[MIDDLE TIER IP ADDRESS]:7997/gitora/main.html name=Gitora
Generating a Diff Script with Gitora

Gitora enables developers to move changes between databases with a single click.

Gitora can also be used to generate a DDL script from the Git repository which can be used to synchronize the source code between two databases. For example, this feature can be used to generate a script to syncronize a production database to the latest version of the source code in the pre-prod database. This tutorial explains how to use this feature in Gitora.

Assume that we are connected to the preprod database and would like to generate a sync script to upgrade prod to the same state the preprod database is in.

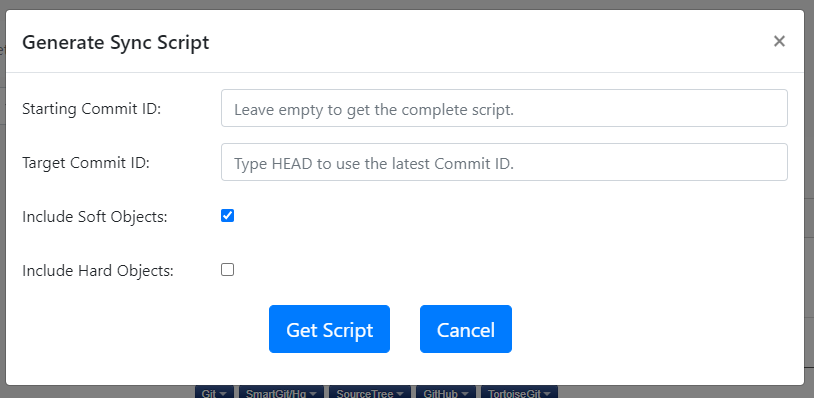
Open the Gitora Application. Select a repo. Next, click the  Git –> Utilities –> Get Script button from the menubar. A dialog shows up.

The Starting Commit ID is the Git Commit ID that is currently deployed in prod. Target Commit ID is the Git Commit ID that we would like to upgrade the prod database to.

Enter the Starting Git Commit ID and the Target Git Commit ID. Use the keyword HEAD if you’d like to use the latest commit in the current active branch as the Target Commit ID.

If you’d like the script to include soft objects (i.e. database objects that execute with CREATE OR REPLACE such as packages, views etc…) check the Include Soft Objects checkbox.

If you’d like the script to include hard objects (i.e. database objects that doesn’t execute with CREATE OR REPLACE such as tables) check the Include Hard Objects checkbox.

Click the Download DDL Script button. Gitora will generate a DDL script which, if executed, will syncronize a schema (or a group of schemas) which is currently at the Starting Commit ID, to the Target Commit ID.

As seen in this example, this feature can be used to apply the latest version of the source code to a production database. If the production database is at Git Commit Point A and the new production-ready version of the source code is at Git Commit Point B, a developer can enter A as the Starting Commit ID and B as the Target Commit ID and then execute the generated script in the production database.

Please note that the table generation is master-detail relationhip aware i.e. the generated tables will be in the correct order with master tables coming before detail tables that reference them.

Introducing Gitora 2.0

Today, we are happy to announce the general availability of Gitora 2.0. We listened to the feature requests coming from the community and we think we are addressing the majority of them with this new version.

Object Type Support

Gitora now supports Object Types. Object Types are supported for the Oracle version 11g and above.

Generate Diff Scripts

Gitora 2.0 helps you create diff scripts between two commit points in your Git repository. Simply, enter the starting Commit Point ID and the target Commit Point ID and Gitora will generate a diff script for you to run in your target database.

Clone Source Code from Another Database

Gitora 2.0 supports cloning Git repositories from remote databases. Connect your local Gitora to the remote Gitora (which manages a remote database) and move the code base from one database to the other automatically.

Pull(Merge), Fetch Source Code from Another Database

Similar to cloning, developers can now pull(merge) source code from a remote database to the source code in a local database automatically if both database are running Gitora 2.0.

Many small improvements and bug fixes

Gitora 2.0 also comes with a number of improvements such as:
– A nicer Git repository browser
– Ability to view changes made in each object prior to issuing a commit
– Cancel any edits made to a PL/SQL object since check-out by clicking a button.

New Gitora Editions

Gitora 2.0 comes in three editions:

Gitora Community Edition

Every feature from Gitora 1.0 continues to be free in Gitora 2.0 Community Edition. We even added new features to it such as object type support, ability to view changes made in each object and canceling edits, along with many bug fixes.

Gitora Professional Edition

We believe proper version control is a big problem in the PL/SQL community, hurting the productivity of many PL/SQL developers and discouraging organizations from using PL/SQL. We think we can help. In order to justify further development on Gitora to help the community to solve this problem, remote database features in Gitora 2.0 will be available in the professional addition. The professional edition also comes with email support and unlimited access to 2.X released of Gitora. We think the benefits you will get from Gitora Professional Edition will far outweigh the small price tag we put on it.

Gitora Enterprise Edition

We know that large enterprises usually have their own unique needs. They might need customizations, new features, integration with other products and services they use, training, more timely and intensive support covered with an SLA etc… For these types of customers, we offer a fully customizable version of Gitora.

Gitora 2.0 Professional Edition comes with a long trial period and even if you decide not to purchase it, it gracefully downgrades to the community edition.

So what are you waiting for? Go download Gitora 2.0! 🙂