Agile Development with a Single Database

Here is the number one question I receive from PL/SQL developers, DBA’s and IT managers who are implementing a version control solution for their Oracle Database:

Developer 1 (or Team 1) works on Feature A (or issue A, bug A, project A). Developer 2 works on Feature B. Both developers make many changes to the PL/SQL code and many commits to the version control repository. We move to testing. Based on the test results, even more commits are made by both developers. Now at the last minute, due to some reason we decide to ship Feature B only. How can we remove Feature A from the source code easily? How does version control help in such a situation?

There are multiple answers to this question. Below, I’ll go over two possible solutions for two potential setups:

  1. If you are using one shared development schema in a single database
  2. If you are using multiple development schemas in a single database (or at least if you are open to the idea.)

If You Are Using One Shared Development Schema

Let’s assume that our development database is called DEV and the shared development schema in DEV is called HR. In other words, both Feature A and Feature B are being developed in the same code base. Let’s also assume that there is no other database for testing. We test in DEV in the schema called HR_TEST.

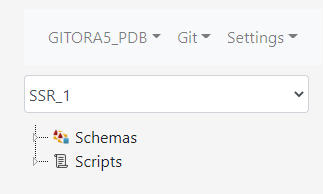
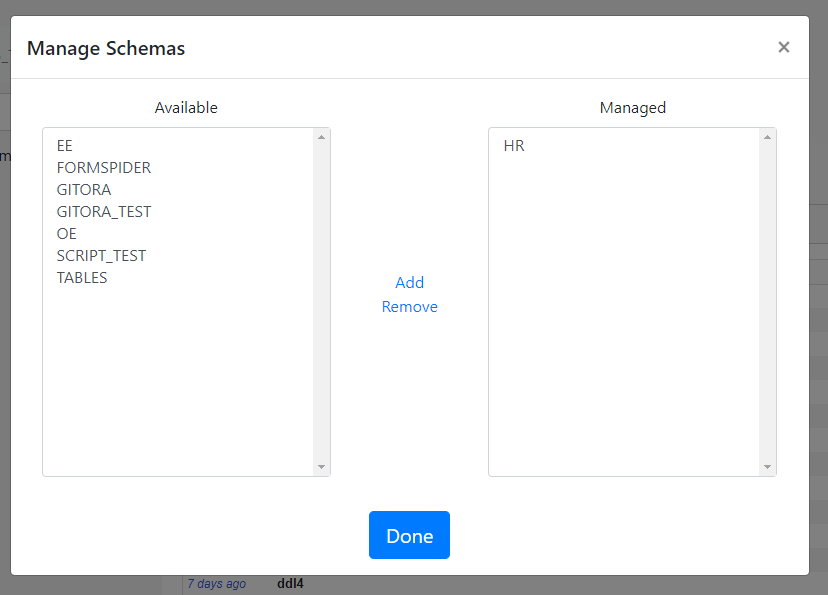
Assume that HR and HR_TEST schemas are managed by two Gitora single schema repos (SSR) repos named HR_REPO and HR_TEST_REPO, respectively.

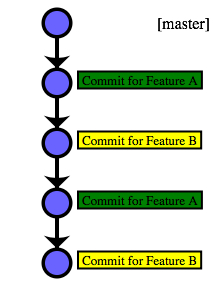
In this case, the commit history in HR_REPO has changes both for Feature A and B in a random order and looks something like this:

There is no easy way to remove the commits for Feature B in this setup. If the team decides to deliver Feature A to production but postpone the delivery of Feature B here are the steps they should follow:

  • Go over the commit history in HR_REPO and find the commits that are related to Feature A.
  • Comment out/revert back/change the edits made for Feature A. Git will help the developers to see what’s changed, added, deleted and what the previous versions of code objects looked like.
  • Commit these new changes to HR_REPO.

At this point the commit history in HR_REPO looks something like this:

And finally, the next steps are:

  • Pull the new version from HR_REPO to HR_TEST_REPO using Gitora.
  • Run tests on the HR_TEST schema. If there are no errors, deliver the new version to production. If there are errors, go to the second step, rinse and repeat until the desired outcome is reached.

In such a setup Gitora provides the following benefits:

  • Gitora keeps track of all changes made to the PL/SQL code in the HR schema, automatically. Developer 2 does not have to remember which PL/SQL objects she modified and what she modified in those objects.
  • Moving the code between HR and HR_TEST schemas is as easy as clicking a button. The team does not need to manually prepare scripts.

The downside of this approach is that it involves manual work which is error prone. Developer 2 still has to manually go through the commit history and make the changes to the source code in the HR schema to disable/remove Feature A. With only one shared development database ( i.e. development environment), there is no easy way to remove Feature A.

If You Are Using Multiple Development Schemas

Now things get more interesting. Below is a simplified workflow that uses only two development databases. This setup enables the IT team to deliver only Feature B to deployment without manually editing PL/SQL code objects to remove Feature A.

Here is our initial set up:

  • Developer 1 works in the schema HR_DEV1 schema and Developer 2 works in the HR_DEV2 schema i.e. both developers (teams) have their own private schemas while they are developing their respective features.
  • Our only test schema is in the same database and is called HR_TEST.
  • HR_DEV1 is schema managed by Gitora single schema repo DEV1, HR_DEV2 is managed by Gitora SSR DEV2 and the HR_TEST is managed by Gitora SSR TEST.
  • DEV1, DEV2 and TEST repos start with the same version of the code which is stored in their master branch.(In other words, DEV1/master and DEV2/master are clones of TEST/master)

Obviously, all Git operations mentioned below are executed using Gitora. Gitora takes care of updating the database code after a Git command is executed.

Developer 1:

  • Using Gitora, create a new branch named featureA (DEV1/featureA). Switch DEV1 to use this new branch.
  • Write code in DEV1.
  • Commit code changes to the DEV1/featureA (using Gitora). Go back to step 2 as many times as needed.

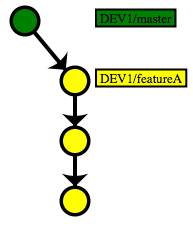
As an example, the commit history of DEV1 looks like this:

Developer 2:

  • Create new branch named featureB (DEV2/featureB). Switch DEV2 to use this new branch.
  • Write code in DEV2.
  • Commit code changes to the repository to DEV2/featureB (using Gitora). Go back to step 2 as many times as needed.

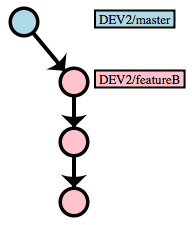
The Git commit history in Gitora DEV2 looks like this:

Moving Code Between Schemas

At any point in time, if Developer 1 or Developer 2 decides to send code to the HR_TEST schema (for example, for integration testing purposes..), they follow the steps below.

Please note that in real world development, the workflows described below can be performed simultaneously in DEV1 and DEV2 repos, in no particular order, any number of times until both features are ready to be deployed to production.

The steps below are merely a simplified example of how this workflow takes place.

Developer 1:

  • In our example , we assume that Developer 1 is the first developer sending her commits to the HR_TEST schema.
  • Merge DEV1/featureA to DEV1/master. (DEV1/featureA –> DEV1/master)
    After the merge, commit history in DEV1 looks like this:
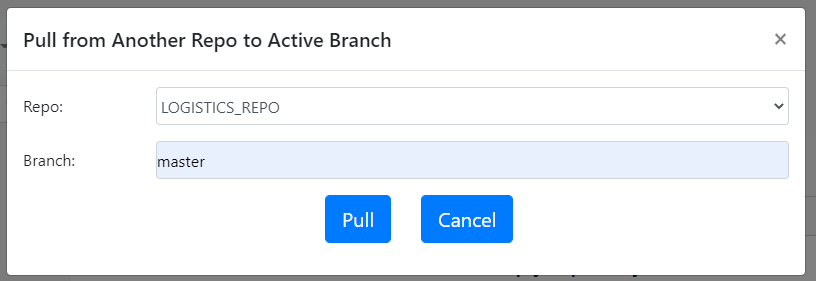
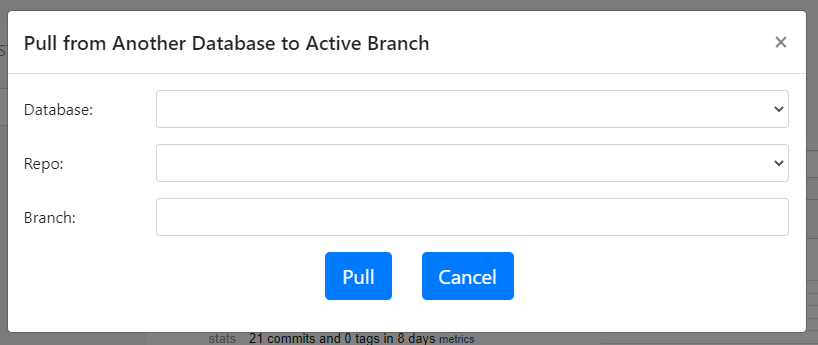
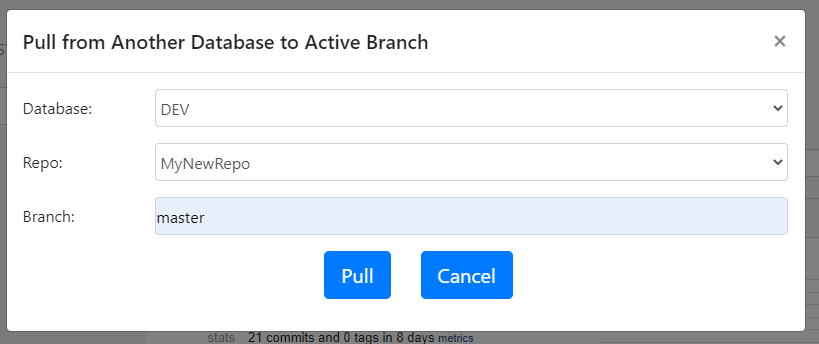
  • Pull master branch from DEV1 to TEST. (DEV1/master –> TEST/master). A “Pull” is simply a two step process of fetching a branch from a remote Git repository and then merging it to a local branch. In our example TEST fetches DEV1/master from the DEV1 repo and merges it to TEST/master which we simply show as DEV1/master –> TEST/master.

    After the pull, commit history of both TEST and DEV1 looks like this:


Developer 2:

Now it is time for Developer 2 to send her changes to the HR_TEST schema. She does the following steps:

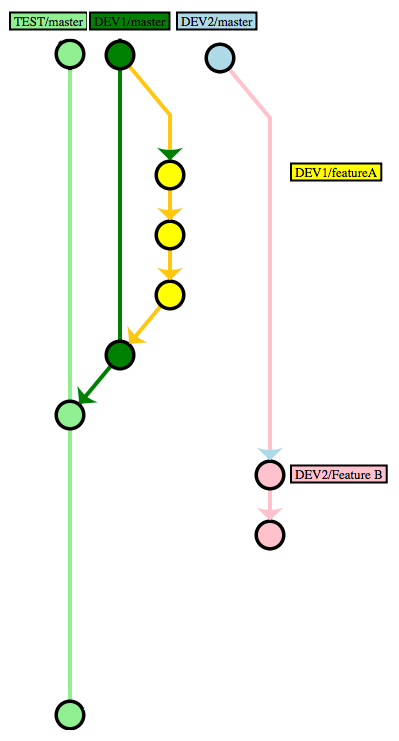
  • Pull master branch from the TEST repo to the master branch in DEV2. (TEST/master –> DEV2/master). (In our example, this is necessary, because TEST/master has received new commits from DEV1/master.) After the pull, the commit history looks like this: (Remember, previously we pulled commits from DEV1/master to TEST/master and we also made commits to DEV2/featureB)
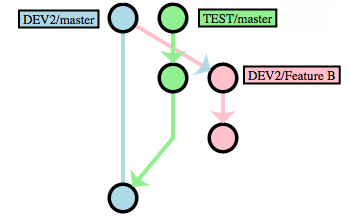
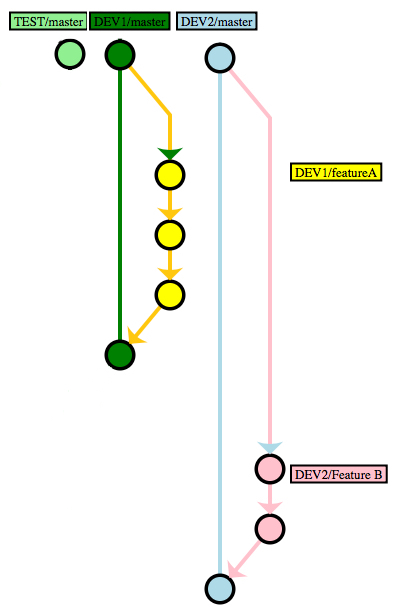
  • Merge DEV2/featureB to DEV2/master. (DEV2/featureB –> DEV2/master) After the merge, the commit history looks like this:
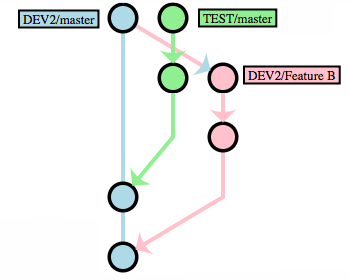
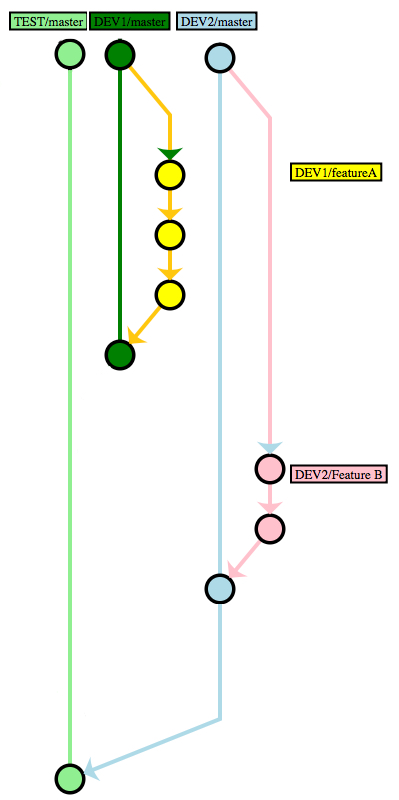
  • Pull master branch from the DEV2 repo to the TEST repo. (DEV2/master –> TEST/master). After the pull, the commit history looks like this:

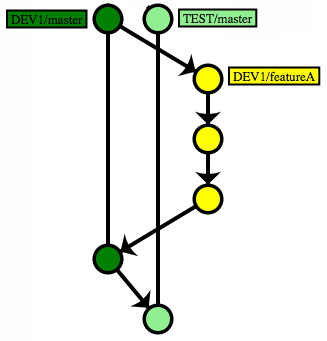
In other words, in its final state, the source code in the HR_TEST schema (and in the TEST repo) is a merge of Feature A and B. In our example, the full commit history of DEV1, DEV2 and TEST repositories look like this:

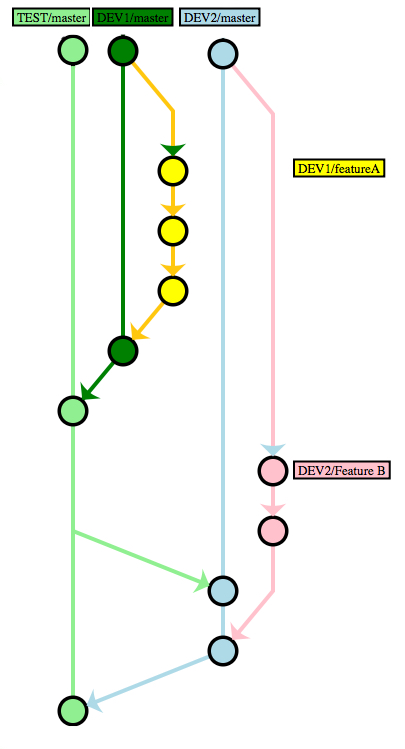
Note that at all times, DEV1/featureA only contains the code for Feature A. Similarly, DEV2/featureB only contains the code for Feature B.

Removing Feature A from the Deployment

This workflow enables the IT team to exclude Feature A from the next version of the software at any point in time before deploying it to the production environment.

To exclude Feature A from the deployment in the example above, follow the steps below:

  • Revert DEV2/master back to its initial state where no code for Feature B has been committed yet. (This uses the Git reset command.)
  • Merge DEV2/featureB to DEV2/master. (DEV2/featureB –> DEV2/master)
  • Reset TEST/master to its original state.
  • Finally, pull master branch of DEV2 to the master branch of TEST. (DEV2/master –> TEST/master)

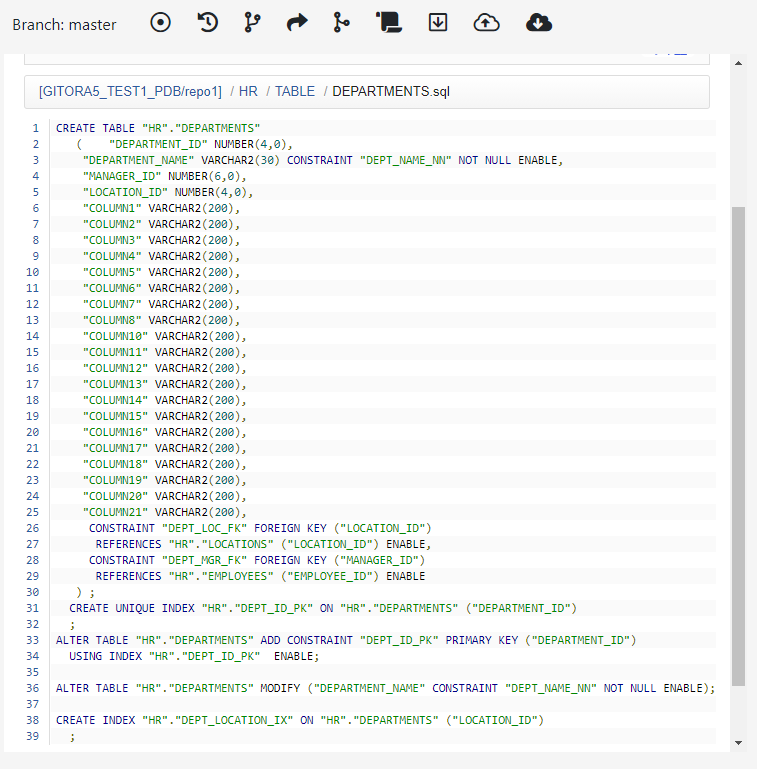
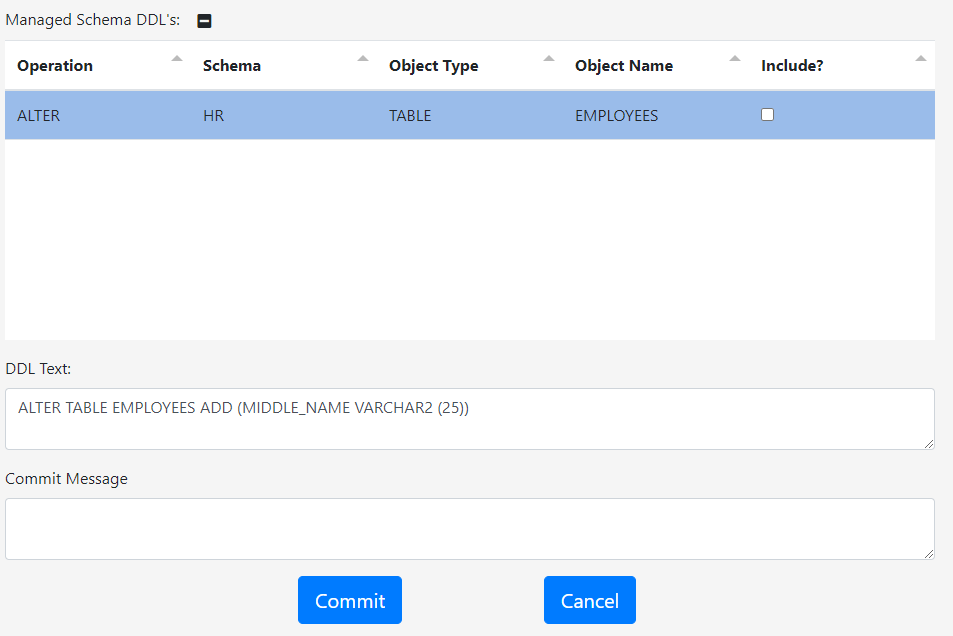
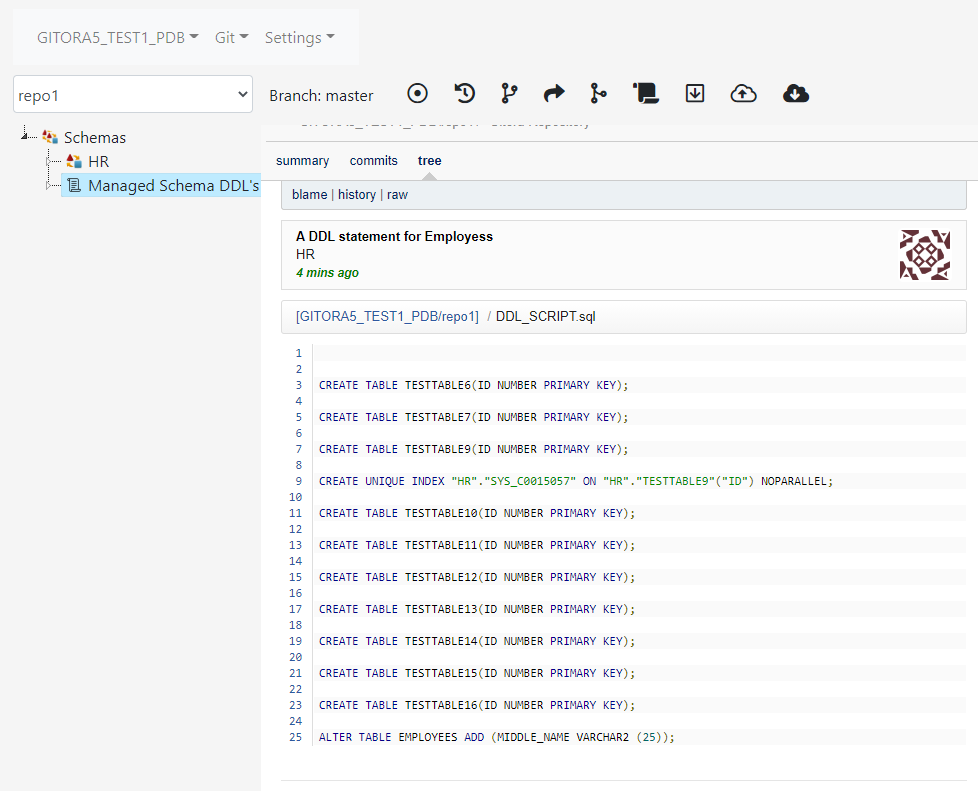
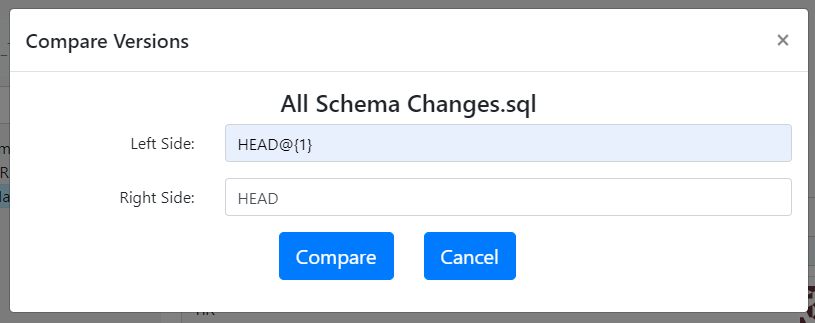
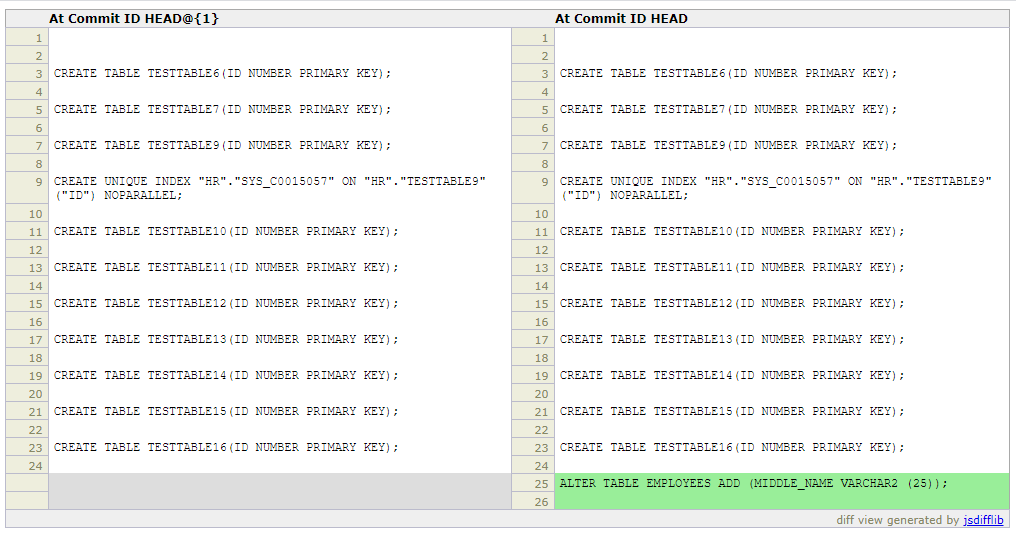
After these steps are completed, the HR_TEST schema only contains code changes related to Feature B. We can use Gitora to extract a DDL script from HR_TEST which contains only the changes made between the initial and final state of TEST/master and use this script to deploy Feature B to the production environment.

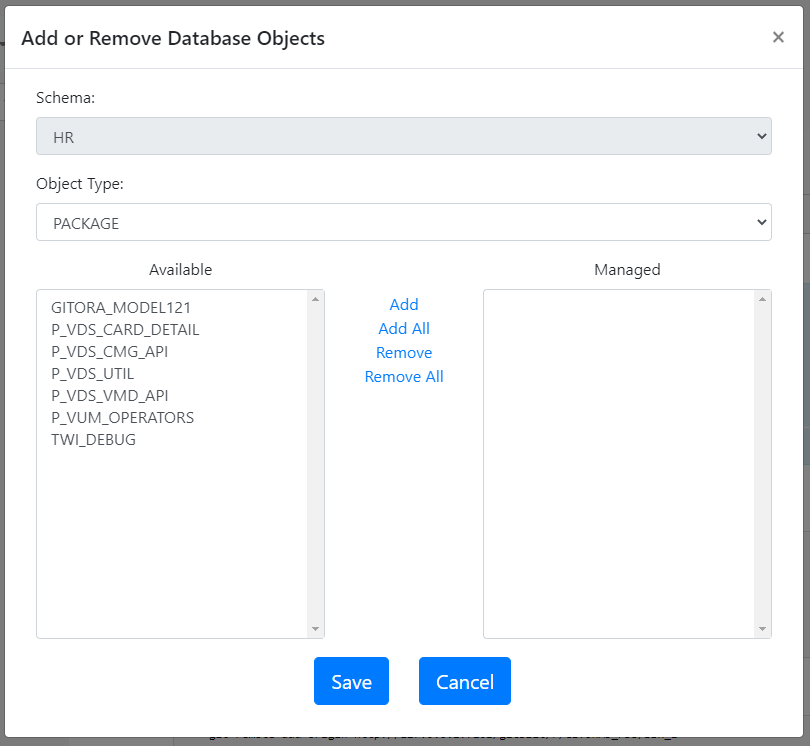
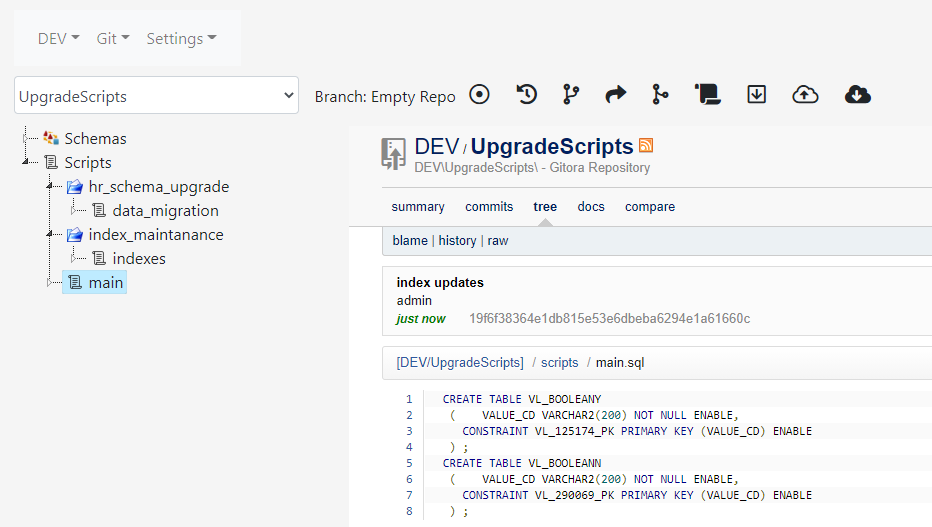
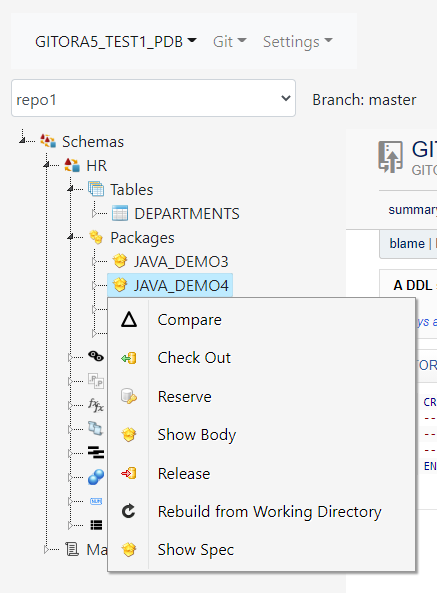
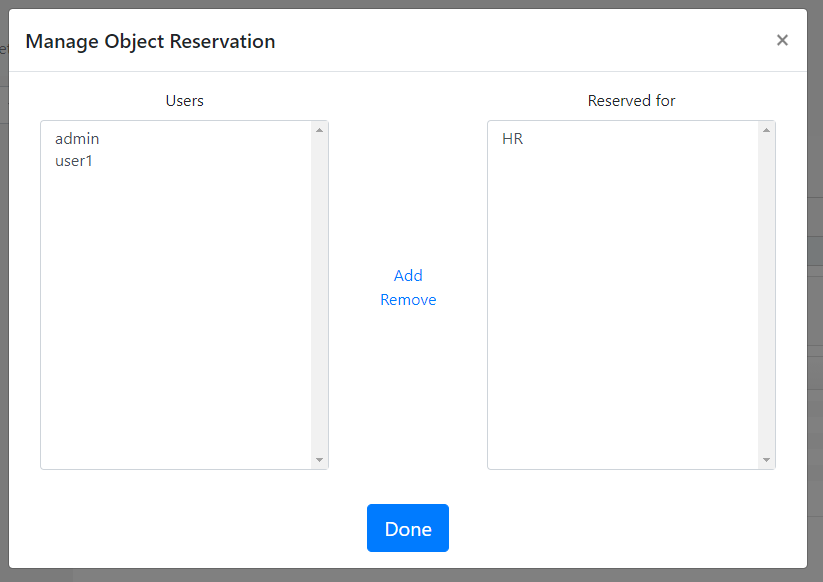
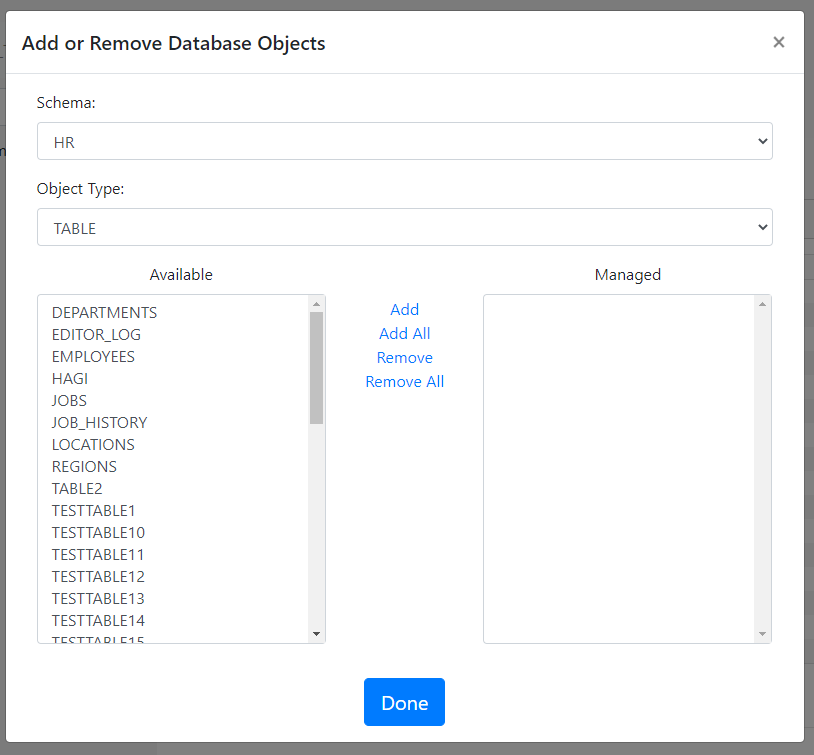
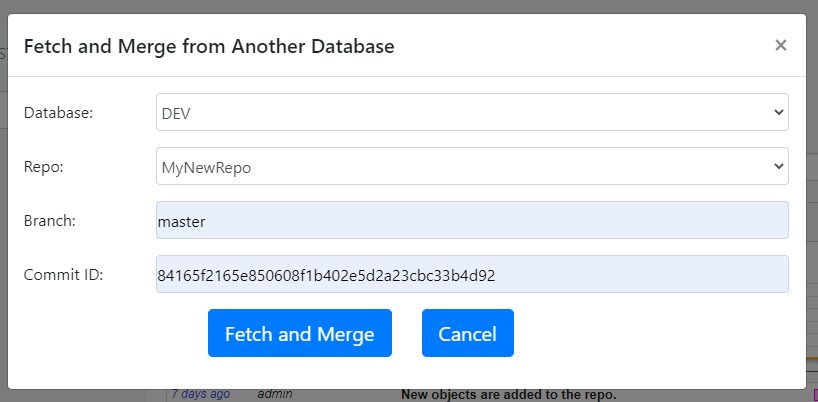
Gitora helps developers execute this workflow with a point&click GUI:

  • Gitora keeps track of all changes made to the PL/SQL code in HR_DEV1, HR_DEV2 and HR_TEST schemas automatically.
  • Gitora updates the source code in the Oracle Database automatically when the executed Git command changes the files in a Git working directory.

Therefore:

  • Developers don’t have to remember which PL/SQL objects they modified and what they modified in those objects.
  • Moving the code between HR_DEV1, HR_DEV2 and HR_TEST is as easy as clicking a button. The team does not need to manually prepare scripts. Gitora can either generate the scripts or update the databases automatically.
  • Crucially, Gitora enables Developer 1 and Developer 2 to switch between code branches automatically. (For example if the DEV1 repo switches its active branch from featureA to the master branch, Gitora automatically updates the code in the HR_DEV1 schema to reflect this change.)

Download Gitora now and try this workflow in your environment.

How to Create a Single Schema Repo

This article shows how you can create a Single Schema Repo (SSR) wit Gitora 6.

Sign in to Gitora. Next click Git –> Repo –> Create Repo –> Single Schema Repo.

The Single Schema Repo Creation Dialog show up.

  1. Enter a unique repo name. (In this example, we’ll call it SSR_1)
  2. Select the schema the SSR is associated to. (In this example it will be associted to the HR schema)
  3. Leave the Manage Schema Changes unchecked for now.
  4. Click save.

The repo SSR_1 is created. SSR_1 can only manage objects that are in the HR schema. (Other than this limitation, the SSR_1 repo works just like any other repo.)

Adding Database Objects To a Single Schema Repo

This process is the same as adding objects to a regular Gitora repo (which is now called a Multi Schema Repo MSR)

Select the SSR_1 repo from the example above from the combobox if it is not already selected.

In the menu bar, click to Git –> Add/Remove Objects. The Add or Remove Database Objects Dialog shows up.

Select the database objects you’d like to manage with this repo and click Save. Use the Object Type dropdown to switch between different object types.

Note that the schema dropdown is disabled because we are working with a Single Schema Repo.

Commit, Reset, Create/Change/Merge/Delete Branch Operations

These commands work just like they do for regular repos. There are no changes.

Pulling from Other Repos

In Gitora 5, repos could only pull from repos managing objects in other databases. In Gitora 6, single schema repos can also pull from other single schema repos managing objects in the same database.

The example below shows how you can pull from one SSR to another managing objects in the same database. All three pull operations (i.e. Pull, Fetch&Merge, Switch to Branch in Another Repo) work the same way.

Let’s assume we have two schemas named LOGISTICS and LOGISTICS_TEST and two SSR’s named REPO_LOGISTICS and REPO_LOGISTICS_TEST, managing these schemas, respectively. Read this article to learn how you can initialize these repos, correctly.

Here are the steps to pull from REPO_LOGISTICS to REPO_LOGISTICS_TEST.

  1. Open the REPO_LOGISTICS_TEST repo in Gitora.
  2. From the menu, select Git –> Pull

The Pull from Another Repo to Active Branch Dialog shows up.

3. Select the name of the single schema repo you want to pull from. (In our case, it is the LOGISTICS_REPO.)

4. Type the name of the branch you want to pull from.

5. Click the Pull button.

That’s it. All changes in LOGISTICS_REPO are now merged to the LOGISTICS_REPO.

FAQ

Can I create multiple Single Schema Repos that are associated to the same schema?

Yes. You can create multiple SSR’s that are associated to the same schema. This is especially useful in dividing the database objects in the schema into multiple logical groups.

Can Single Schema Repos pull from other databases?

Yes. It works exactly like it does in Gitora 5. In the Gitora app, select Git–>Other Databases–>Pull from the menu bar.

Can I track changes to tables with a Single Schema Repo?

Yes. Just like with regular repos, the same SSR can be used for both managing packages, procedures etc… and tracking table DDL’s. A single schema repo can only track the table changes in the schema it is connected to. Please read this article to learn how Schema Management in Gitora works and read this article to learn how an SSR manages the schema it is assoicated to.

Reserving Database Objects for Authorized Users

Gitora 5 Enterprise enables you to reserve database objects so that they can be edited by authorized users only.

To achieve this, in the Gitora web app, right click the database object you’d like to reserve and click the Reserve menu option.

The Manage Object Reservation dialog shows up. In the dialog select the users you’d like to reserve the object for and click the Done button.

Once an object is reserved for a user (or users) only those users can edit it.

Conversely, users can be excluded from editing a database object.

To achieve this, right click on the database object and click the Exclude menu option.

The Manage User Exclusion dialog shows up.

Add the users that you’d like to restrict from changing this object and click the Done button.

From this moment on, the selected users cannot edit the database object.

Database Script Management

Database developers and DBA’s have many scripts that they use for various purposes such as performance monitoring, migration, software upgrades and database maintanance.

There is often no good way to manage these scripts. DBA’s, developers end up emailing them to each other. The lack of good management and communication around scripts causes human mistakes during database upgrades and maintanance.

Gitora 5.1 Enterprise Edition introduces a new feature called Scripts. In Gitora 5.1, each Gitora repo has a separete section where you can manage your database scripts with the power of git.

Gitora scripts feature provides a single source of truth to DBA’s and developers.

Simply create any folder hierarchy you want and add your scripts to Gitora.

Git will store the entire version history of your scripts. You can view changes in your scripts over time. Find out who changed what and when.

You can also restrict who can edit the scripts.

When you pull a repo from one database to another, the scripts will move with the repo to the target database. This ensures that you always move the right version of a script to the target database, preventing emails, IM messages and many other needless back and forth between developers and DBA’s.

Gitora Webinar

On February 16th, we hosted a webinar about Gitora 5. Many thanks to everyone who attended. The recording of the webinar is below.

You can view the slides for the webiner below. You can also download the slides from this link.

There were a few questions we received several times during the webinar. We’d like to reiterate our answers below:

How does Gitora work with GitLab, GitHub or similar services…?
Gitora repos work with these services just like any other local Git repo does. From the point of GitLab, GitHub or similar services, Gitora repos are just local repos that you can push to these services.

How can I create a merge/pull request with Gitora?
Merge/Pull request is not a Git feature. It is a GitHub/GitLab feature. You can continue creating merge/pull requests on these services using the same workflow you use for any other local repo. To create a merge/pull request for a Gitora repo, first push your repo to GitHub/GitLab using the Gitora web app (or use Git directly). Next, go to your GitHub/GitLab account and create your merge/pull request.

How can I work on two different projects with different deadlines in the same code base using only one development database and send only code related to one project to the test database?

Update: Gitora 6 introduced Single Schema Repos (SSR). SSR’s enable developers to work on different projects with different deadlines in the same code base using only one development database. Please read our Gitora 6 announcement post for more.

User Privileges in Gitora Enterprise

Gitora Enterprise comes with a comprehensive authorization module. Using this module, Gitora admins and other privileged users can assign various roles to Gitora users to limit or enhance what they can do during database development and using Gitora’s capabilities.

Authorization settings in Gitora can be set at three levels:

  • Database
  • Repo
  • Database Object

Database Level Authorization

The highest level where privileges for users can be set is the database level. Only admins can set database level authorization. Each database managed by Gitora has its own authorization scheme that can be set separately.

Gitora Enterprise comes with two default roles: Developer and Release Manager. Customers can edit the database level authorization according to their needs by either editing existing default roles, deleting them or creating new ones.

Each user in Gitora Enterprise must be assigned a database level role.

Gitora provides database level privileges to execute the following functions. These priveleges can be given or taken from a role as desired:

System Privileges:

Edit Repos: Create, edit or delete repos.

Edit Remotes: Create, edit or delete remote repo entries.

Edit Repo Roles: Create, edit, delete or assign repo level roles.

Developer Privileges

Checkout: Take control of a database object to edit it.

Commit: Commit database objects to Git.

Edit Managed Schema Script: Edit the contents of the “Managed Schema Script” file in Gitora.

Repo Management Privileges

Add/Remove Objects: Add or remove database objects to/from a repo.

Add/Remove Schemas: Add or remove schemas to/from a repo for Gitora to keepo track of DDL statements executed in that schema.

Local Git Command Privileges

Reset: Execute the Git Reset command for a repo.

Create Branch: Execute the Git create branch command for a repo.

Change Branch: Change the active branch in the database for the repo.

Merge Branch: Perform a Git Merge for a repo.

Delete Branch: Delete a branch in a repo.

Tag: Mark a Git commit ID in a repo with a recognizable indentifier.

Remote Git Command Privileges

Push: Perform a Git Push to a remote repository.

Pull: Perform a Git Pull from a remote repo.

Fetch and Merge: Fetch a commit ID from a remote repo and merge it to the current branch.

Switch to Remote Branch: Fetch a remote branch and make it the active branch of the current repo.

Other Privileges

Get Script: Download the diff DDL script of two commit ID’s of a repo.

Rebuild from Working Directory: Execute the DDL statement file of a database object (or all database objects) in the working directory folder of a repo in the database.

Managing Database Level Authorization

Log in to Gitora as an admin. Select [Connected Database Name] – > Database Authorization menu item from the main menubar.

The Manage Database Roles page shows up.

Gitora Enterprise comes with two built-in roles: Developer and Release Manager. Privileges for both of these roles are editable. You can also create your own roles.

To create a role click the Add button. The Create Role Dialog shows up. Enter a descriptive name for the role. Check the checkboxes next to the functions that you want the new role to be able to perform. Click the Save button.

Editing existing roles work in a similar way.

Click the delete button on the Manage Database Role page to delete a role.

Repo Level Authorization

Repo level authorization is optional. An admin or a user with the database level privilege Edit Repo Roles can manage repo level privileges. When activated, repo level privileges override any privileges set at the database level for the database objects in the repo and Gitora functions performed for the repo. When users work with a database object that belongs to a repo with an active authorization scheme, they are assigned a repo level role that overrides their database level role. For example, a user with a database level Release Manager role, can act with a Developer role in the context of a repo with an authorization scheme of its own.

Once repo level authorization is activated for a repo, a repo level role must be given to a user explicitly. If no repo level role is assigned to a user, she will have no privileges in the context of the repo with repo level privileges. Admins are not affected by repo level authorization.

Repo level privileges that Gitora Enterprise provides are a subset of the database level privileges. System privileges are only set at the database level. The following privileges can be set at the repo level:

Developer Privileges

Checkout: Take control of a database object to edit it.

Commit: Commit database objects to Git.

Edit Managed Schema Script: Edit the contents of the “Managed Schema Script” file in Gitora.

Repo Management Privileges

Add/Remove Objects: Add or remove database objects to/from a repo.

Add/Remove Schemas: Add or remove schemas to/from a repo for Gitora to keepo track of DDL statements executed in that schema.

Local Git Command Privileges

Reset: Execute the Git Reset command for a repo.

Create Branch: Execute the Git create branch command for a repo.

Change Branch: Change the active branch in the database for the repo.

Merge Branch: Perform a Git Merge for a repo.

Delete Branch: Delete a branch in a repo.

Tag: Mark a Git commit ID in a repo with a recognizable indentifier.

Remote Git Command Privileges

Push: Perform a Git Push to a remote repository.

Pull: Perform a Git Pull from a remote repo.

Fetch and Merge: Fetch a commit ID from a remote repo and merge it to the current branch.

Switch to Remote Branch: Fetch a remote branch and make it the active branch of the current repo.

Other Privileges

Get Script: Download the diff DDL script of two commit ID’s of a repo.

Rebuild from Working Directory: Execute the DDL statement file of a database object (or all database objects) in the working directory folder of a repo in the database.

Managing Repo Level Authorization

Select a repo from the main select box in the Gitora Web App. Click the Git -> Repo -> Repo Authorization menu item from the menubar. The Manage Repo Roles page shows up.

Use the Add, Delete and Edit buttons to manage repo level roles.

Check the Enable Repo Level Authorization Scheme checkbox so that the repo level roles take effect. You can disable repo level roles by unchecking this checkbox at any time.

To assign a repo level role to a user, click the [Connected Database Name] – > Users menu item from the menubar. Click the Edit button next to a user. The Edit User screen shows up.

Please note that the top portion of this screen where you can edit a users name, password, database role etc… will only show up for admins.

The table at the bottom of the screen with the title Repo Specific Roles for User displays the roles a user has for a specific repo. To add a role click the Add button. The Add Repo Role Dialog shows up.

Select the repo and the role you’d like to assign to the user in this repo. Please note that the repo select box only shows repos with repo level roles. Click the Save button.

The assigned role will show up in the edit user page.

Please note that, a user can only have one role for a repo. To change the user’s role, delete the current role and create a new one.

Database Object Level Authorization

Gitora Enterprise enables admins and users with database level privilege Edit Repo Roles to reserve a database object for a user or group of users. This way, only the users in the reservation list can check out (and therefore edit) an object.

To achieve this, in the main select box, select the repo the obejct is in. Navigate to the object in the tree and right click to it. In the context menu, click Reserve.

The Manage Object Reservation Dialog shows up. Select the user and click the Add link to add the user to the list of users for whom this object is reserved. Click the Done button when you are finished.

Gitora API’s

This is the Gitora API documentation for version 6.1 and below. For the latest API documentation please go to this link.

Gitora Enterprise has a set of API’s that enables developers to programatically execute tasks that users can perform via the Gitora Web App such as reset, create branch, commit etc…

Below is the list of API’s with their description, input parameters and outputs.

Gitora API’s respect the authorization scheme defined in the Gitora Web App. In other words, if a user lacks the necessary privilege to perform an operation in the Gitora Web App, the corresponding API will also fail for the same user.

Introduction

After the default installation, Gitora API’s can be accesses from the URL http://[IP ADDRESS]:8080/gitora/api.

The method parameter specifies the name of the method you’d like to execute like so:

http://localhost:8080/gitora?method=login.....

Developers must log in to the API server before executing any other API call. Therefore, it makes sense to describe the login method first.

Method: login

Use to sign in to Gitora.

Parameters:

user: A valid Gitora username.

password: Password of the Gitora user.

database: The name of the database. This name is specified in the Settings->Database Connections screen in Gitora.

Output:

The login method returns a token that you need to use in every other API call.

Example: http://localhost:8080/gitora/api?method=login&user=admin&password=admin

Method: add

Add a database object to a Gitora repo.

Parameters:

name: Name of the database object

repo: Name of the repo to add the database object to.

schema: Schema of the database object to be added.

token: A valid token string received from a login API call.

type: Type of the database object to be added. Valid values are TABLE, PACKAGE, VIEW, PROCEDURE, FUNCTION, TRIGGER, SYNONYM, TYPE, SEQUENCE, MATERIALIZED_VIEW

Output:

Returns null if it completes successfully. It returns an error message if the operation fails.

Example:

http://localhost:8080/gitora/api?method=add&name=EMP_PKG&repo=HR_REPO&schema=HR&token=YhfhseY45&type=PACKAGE

Method: changebranch

Changes the active branch of a Gitora repo.

Parameters:

branch: Name of the branch to switch to.

repo: Name of the repo this operation will be performed.

token: A valid token string received from a login API call.

Output:

Returns null if it completes successfully. It returns an error message if the operation fails.

Example:

http://localhost:8080/gitora/api?changebranch&branch=dev&repo=HR_REPO&token=Hhjfir7hd87

Method: checkout

Checks out the database object for a specific user.

Parameters:

object: ID of the object to check out

token: A valid token string received from a login API call.

Output:

Returns null if it completes successfully. It returns an error message if the operation fails.

Example:

http://localhost:8080/gitora/api?checkout&object=1234&token=Hdyhed7645g

Method: commit

Commits a list of objects to the specified repo.

Parameters:

message: Commit message.

ddls: A comma separated list of ID’s of DDL statements captured by Gitora.

objects=Comma separated list of object ID’s to be committed.

repo: Repo name.

token: A valid token string received from a login API call.

Output:

Returns the message received from Git.

Example:

http://localhost:8080/gitora/api?commit&message=Fixed%20the%20employee%20queries&objects=1234,4523&ddls=3642,7854&repo=HR_REPO&token=jirHJj8rfnJi

Method: createbranch

Creates a new branch in the specified repo.

Parameters:

branch: Name of the new branch.

checkout: Indicated whether the new branch should be set as the active branch. Set to true to make the new branch the active branch, to false otherwise.

commitid: Git commit ID, tag name or branch name to create the new branch from.

repo: Name of the repo to create a branch in.

token: A valid token string received from a login API call.

Output:

Returns a list of modified database objects if there are any or an error message.

Example:

http://localhost:8080/gitora/api?createbranch&checkout=true&commitid=Hdjdjhuend8874h29jdij&repo=HR_REPO&token=Kjirjdnc767yHy3

Method: createrepo

Creates a Gitora repo.

Parameters:

repo: Name of the repo to be created.

token: A valid token string received from a login API call.

Output:

Returns the message received from Git.

Example:

http://localhost:8080/gitora/api?createrepo&repo=HR_REPO&token=HJndnr8783dj

Method: deletebranch

Deletes the specified branch.

Parameters:

branch: Name of the branch to be deleted.

repo: Name of the repo the branch is in.

token: A valid token string received from a login API call.

Output:

Returns the message received from Git or an error message.

Example:

http://localhost:8080/gitora/api?deletebranch&branch=dev&repo=HR_REPO&token=Hjfurns75bdy

Method: fetchmerge

Fetches a specific commit ID from a remote repo and merges it to the specified repo’s active branch.

Parameters:

branch: The name of the remote branch to fetch from.

commitid: Git commit ID to fetch from the remote branch and merge to the active branch.

password: The password or the personal access token to connect to the remote repo. For example your GitHub personal access token. This parameter is optional. Don’t use it if the remote repo does not need a password to access.

remote: The alias specified for the remote database in the Gitora Web App.

repo: The name of the local repo.

token: A valid token string received from a login API call.

user: user name to connect to the remote repo. For example your GitHub user name. This parameter is optional. Do not use it if the remote repo does not need a user name to access.

Output:

Returns the message received from Git.

Example:

http://localhost:8080/gitora/api?fetchmerge&branch=dev&commitid=Jdudnr75hfgsj84fj&password=myPersonalAcessToken1&remote=myRemoteHRRepo&repo=HR_REPO&user=myGitHubUser&token=Hjnf74hehd

Method: fetchmergefromdb

Fetches a specific commit ID from a Gitora repo for another database and merges it to the specified repo’s active branch.

Parameters:

branch: Name of the branch to fetch from the fromrepo.

commitid= Git commit ID to fetch from the branch and merge to the active branch.

database: Name of the database the fromrepo is for.

fromrepo: Name of the repo to fetch from.

torepo: Name of the repo to merge to.

token: A valid token string received from a login API call.

Output:

Returns message received from Git.

Example:

Assume Gitora is connected to the TEST database. The example below fetches the commitid 1234 on branch master from the HR_REPO_DEV repo at the DEV database to the active branch of the HR_REPO at the TEST database.

http://localhost:8080/gitora/api?fetchmergefromdb&branch=master&commitid=1234&database=DEV&fromrepo=HR_REPO_DEV&torepo=HR_REPO&token=Hjnf74hehd

Method: getmanagedschemascript

Returns the “managed schemas script” of the specified repo.

Parameters:

repo: Name of the repo of which the developer is getting the managed schemas script.

token: A valid token string received from a login API call.

Output:

The contents of the managed schemas scrpt file, represented as the DDL_SCRIPT.sql in the Git repo.

Example:

http://localhost:8080/gitora/api?getmanagedschemasscript&repo=HR_REPO&token=Kjfur03nd8

Method: getmyobjects

Returns the list of checked out database objects by the current user.

Parameters:

repo: The repo for which the API queries the objects the user has checked out.

token: A valid token string received from a login API call.

Output:

Returns a JSON array. Each object in the array represents an database object that is checked out by the user. Each JSON object in the array has the following attributes:

id: ID of the database object in Gitora.

name: Name of the object.

schema: Schema of the object.

status: Indicates the modification state of the object. Valid values are: UNMODIFIED,MODIFIED, DELETED

type: Type of the object. (PACKAGE, PROCEDURE etc…)

token: A valid token string received from a login API call.

Example:

http://localhost:8080/gitora/api?method=getmyobjects&repo=HR_REPO&token=Jnjf744jn

Method: getrepoobjects

Returns a JSON array of database objects in the repo.

Parameters:

repo: Name of the repo to return the objects for.

token: A valid token string received from a login API call.

Output:

Returns a JSON array. Each object in the array represents a database object managed by the specified repo. Each JSON object in the array has the following attributes:

id: ID of the database object in Gitora.

name: Name of the object.

schema: Schema of the object.

status: Indicates the modification state of the object. Valid values are:

token: A valid token string received from a login API call.

type: Type of the object. (PACKAGE, PROCEDURE etc…)

UNMODIFIED,MODIFIED, DELETED

user: Name of the user who checked out the database object.

Example:

http://localhost:8080/gitora/api?method=getrepoobjects&repo=HR_REPO&token=Nkjf8nf8

Method: merge

Performs git merge.

Parameters:

commitid: Git commit ID, branch or tag name to merge to the active branch.

repo: Name of the repo to perform merge on.

token: A valid token string received from a login API call.

Output:

Returns the the text value conflict if there is a conflict after the merge or noconflict if there isn’t any.

Example:

http://localhost:8080/gitora/api?method=merge&commitid=dev&token=Hjfur84bnfr

Method: pullfromdb

Performs a Git pull from a Gitora repo for another database to the specified repo’s active branch. For example, you can pull the master branch of HR_REPO in DEV database to the master branch of HR_REPO in TEST database to move your latest code to the testing environment.

Parameters:

branch: Branch name on the fromrepo to pull.

database: Name of the database (identified in Gitora Web App under Settings->Database Connections) the from repo is for.

fromrepo: Repo to pull from.

token: A valid token string received from a login API call.

torepo: Repo to pull to.

Output:

Returns the message received from Git.

Example:

Assume thet the developer is connected to the TEST database. The example below pulls the master branch from the HR_REPO repo for DEV database to the master branch of HR_REPO repo for the TEST database.

http://localhost:8080/gitora/api?method=pullfromdb&fromrepo=HR_REPO&torepo=HR_REPO&branch=master&database=DEV&token=Hjgg6ghf

Method: push

Pushes the specified repo’s branch to a remote Git repo (which commonly resides in GitHub, GitBlit, BitBucket or a similar cloud service).

Parameters:

branch: Name of the branch to push.

password: Password or the personal access token to connect to the remote repo.

remote: The alias specified for the remote repo in the Gitora Web App under Settings–>Manage Remote Connections.

repo: Name of the repo to push.

token: A valid token string received from a login API call.

user: User name to connect to the remote repo.

Output:

Returns the message received from Git.

Example:

http://localhost:8080/gitora/api?method=push&branch=master&password=1234&remote=GitHubHRRepo&repo=HR_REPO&user=myGitHubUser1&token=Hjf85jf

Method: release

Releases the lock placed by a user on a database object. Overwrites the content of the object with the latest version available in the active branch.

Parameters:

object=ID of the database object to be released.

token: A valid token string received from a login API call.

Output:

Returns null if succeeds or an error message if it fails.

Example:

http://localhost:8080/gitora/api?method=release&object=3455&token=Hjfu57hf

Method: remove

Removes the specified database object from Gitora.

Parameters:

name: Name of the database object.

repo: Name of the repo the database object will be removed from.

schema: The schema of the object

token: A valid token string received from a login API call.

type: The type of the object. Valid values are: Valid values are TABLE, PACKAGE, VIEW, PROCEDURE, FUNCTION, TRIGGER, SYNONYM, TYPE, SEQUENCE, MATERIALIZED_VIEW.

Output:

Returns null if succeeds or an error message if it fails.

Example:

http://localhost:8080/gitora/api?method=remove&name=EMP_PKG&repo=HR_REPO&schema=HR&type=PACKAGE&token=Hfjuh784hnd

Method: reset

Performs the Git reset command on the active branch of the specified repo.

Parameters:

commitid: Git commit ID or tag name to reset the active branch to.

repo: Name of the repo to perform the Git reset.

token: A valid token string received from a login API call.

Output:

Returns the Git message received from Git.

Example:

http://localhost:8080/gitora/api?method=reset&commitid=375hfhd&repo=HR_REPO&token=Hjfnh894jhhnfr

Method: setmanagedschemascript

Updates the “Managed Schema Script” content and commits it.

Paramaters:

message: Commit message to be used when the new script is committed to Git.

repo: Name of the repo to set the script for.

script: The new text of the script.

token: A valid token string received from a login API call.

Output:

Returns the message received from Git.

Example:

http://localhost:8080/gitora/api?method=setmanagedschemascript&messageScript%23updated.&repo=HR_REPO&script=ALTER%23EMPLOYEES%23ADD%23COLUMN%23(MIDDLE_NAME%23VARCHAR2(200);&token=Hjhu837h

Method: switchtobranchfromdb

Fetches the branch in a repo for another database and makes it the active branch in the specified repo for the currently connected database. Used if the fetched branch is not present in the repo for the currently connected database. For example the featureA branch in HR_REPO for the DEV database may not exist in the HR_REPO for the TEST database. Using this API will bring over the featureA branch from DEV to TEST and make it the active branch.

Parameters:

branch: Name of the branch to fetch and make active.

database: The database the fromrepo is for.

fromrepo: Name of the repo to fetch the branch from.

token: A valid token string received from a login API call.

torepo: Name of the repo to fetch the branch to. It is expected that torepo does not have this branch.

Output:

Returns the message received from Git.

Example:

Assume that the featureA branch is in DEV but not in TEST database and the developer is connected to the TEST database. The example below fetches the featureA branch from the DEV database to the TEST database and makes it the active branch.

http://localhost:8080/gitora/api?method=switchtobranchfromdb&fromrepo=HR_REPO&database=DEV&torepo=HR_REPO&branch=featureA&token=Hjfi94fj4

Method: switchtoremotebranch

Fetches the branch in the remote repo and makes it the active branch in the specified repo for the currently connected database. Used if the fetched branch is not present in the repo for the currently connected database. For example the featureA branch in the remote repo GitHubHRREPOmay not exist in the HR_REPO for the TEST database. Using this API will bring over the featureA branch from remote repo to the TEST database and make it the active branch.

Parameters:

branch: Name of the branch to fetch from the remote and make active.

database: The database the fromrepo is for.

password: The password or personal access token to connect to the remote repo.

remote: Alias of the remote repo specified in the Gitora Web App under Settings–>Manage Remote Repos.

repo: Name of the repo to fetch the branch to. It is expected that torepo does not have this branch.

token: A valid token string received from a login API call.

user: User name to connect to the remote repo.

Output:

Returns the message received from Git.

Example:

Assume that the featureA branch is in remote GitHubHRRepo but not in local HR_REPO for the TEST database and the developer is connected to the TEST database. The example below fetches the featureA branch from the GitHubHRRepoto the TEST database and makes it the active branch.

http://localhost:8080/gitora/api?method=switchtoremotebranch&remote=GitHubHRRepo&torepo=HR_REPO&branch=featureA&user=myGitHubUser&password=1234&token=Hjfi94fj4

Managing Tables

With Gitora 5 users can track changes made to any table’s definition individually.

The way tables work in Gitora is very similar to the way soft objects such as packages, procedures work but there are a few key differences. We’ll go over them briefly.

Adding a Table to a Repo

You can add a table to a Gitora repo just like you add any other object. Simply open a repo from the main select box. Click Git->Add/Remove Object from the menubar. The Add/Remove Database Objects dialog shows up.

Simply, select, add the tables you’d like to include to the open repo and click the Done button.

Gitora will generate a DDL script for the table and save it as a file in the Git repo. The DDL script will contain the table’s definition as well as any constraints and indexes created on it.

Making Changes To a Table Definition

The workflow for executing a DDL on a table managed by Gitora is exactly the same as any other object managed by Gitora.

Once a table is added to a Gitora repo, developers must log in to Gitora in their database session to be able to make modifications to its definition. (The table must also be available for checkout for the developer to execute a DDL statement on the table.)

After a developer executes a DDL statement for the table (such as adding a column), Gitora automatically checks out the table for the developer if the table is not checked out by another developer already.

The developer can commit her changes to Git just like she commits any other object in the Gitora app, namely by clicking the “Git->Commit” item in the menubar and including the table in her commit.

Effects of Executing Git Commands on Tables

Executing Git commands such as reset, change branch, merge may change the file that contains the table DDL. The file will contain the correct DDL statement for the current Git commit ID. However, Gitora will not reflect this change in the database. This behavior differs from how Gitora behaves for soft objects such as packages, views, procedures etc… If there are changes, Gitora updates these objects in the database after a Git command is executed.

Sequences and materialized views work the same way as tables.

In Gitora parlance, any object that can be used with CREATE OR REPLACE syntax is called a soft object. Objects such as tables, sequences and materialized views which cannot be used with CREATE OR REPLACE are called hard objects.

Altough one repo can store both hard and soft objects without any issues, we recommend users to store hard and soft objects of a project in separate repos.

Moving Hard Object Changes between Databases

Gitora can move soft objects (packages, procedures, views etc…) between databases with a single click or an API call (enterprise edition only) automatically.

The method described above to track tables is very useful to create schemas from scretch, to track changes over a period of time and see the definition of an object in a previous state. However, it is not very useful to move hard object changes to another database. To achieve this, Gitora has a “Managed Schemas” feature. You can register one ore more schemas to a Gitora repo so that it tracks every hard object DDL statement executed in these schemas. To achieve this, click Git->Add/Remove Managed Schema. Select the schemas you want to manage and click Done.

In the picture above, Gitora will track DDL statements executed in the HR user.

Let’s assume that we execute the following DDL statement in the HR schema:

ALTER TABLE EMPLOYEES ADD (MIDDLE_NAME VARCHAR2 (25));

DDL statements show up in the “Managed Schema DDL” section of the Commit Changes page.

Once committed, these DDL statements show up in a file named “Managed Schema DDL’s” in the Gitora main screen. Please note that the DDL statement above shows up at the end of the document after it is committed.

As developers commit their DDL statements, they are added to this file. Gitora users can edit this file by clicking Edit in its right click menu.

If we pull this repo (say from DEV to TEST) the “Managed Schema DDL’s” will also be pulled.

Once the pull is completed, the DDL statement we executed in DEV is now in TEST but not yet executed.

To determine which DDL statements we need to execute, we simply need the diff between the Managed Schema DDL’s file’s current state and previous state before the pull. We get this diff by right clicking the Compare button in the right click menu of the Manage Schema DDL’s file.

The Compare Versions dialog shows up. Left Side and Right Side fields accept any Git commit ID. Clicking the compare button shows a screen which highights the differences between the two versions of the Manage Schema DDL’s file.

HEAD@{1} is a Git shorthand that represents the previous commit ID (before the pull) and similarly HEAD represents the current commit ID (after the pull). Clicking the Compare button gives the following result:

The DDL statement we need to execute in TEST to sync it with DEV is highlighted in green.

Any Gitora repo can manage any number of schemas. However, we recommend users to create a separate repo to manage schemas of a project.

Introducing Gitora 5

We are very excited to announce that Gitora 5 is now available for download.

Gitora 5 is a huge step forward for version management of database objects.

Gitora 5 has many new features. Below are just six of our favorites:

  • A Brand New User Interface and Application
  • One Gitora Installation to Manage Any Number of Databases
  • Gitora Now Manages Tables
  • No-login development experience
  • A Comprehensive Developer Privileges Management Module
  • Full API To Completely Automate Your Workflow

Let’s go over these new features briefly:

A Brand New User Interface and Application

We redesigned every screen in Gitora from the ground up. The new design gives Gitora 5 a beautiful modern look with large components, easy to read, fresh colors and updated icons. 

We also rebuilt the application with Java. This reduced Gitora’s database footprint by more than 95% making it much easier to install and manage.

One Gitora Installation to Manage Any Number of Databases

This was probably one of the most requested features. Previously, if you wanted to manage a database with Gitora, you needed a new Gitora installation. This is no longer the case.

Thanks to Gitora 5’s new architecture, users can now manage any number of databases with Gitora 5 from a single application.

This makes moving code and switching between databases much easier. Maintenance and upgrade tasks are also much simpler because there is only one application to manage.

Moreover, we made installing Gitora much easier. No more running hundreds of database scripts or changing database settings. Once you create a database user for Gitora, the application will automatically install its database objects.

Gitora Now Manages Tables

Tables are now first class citizens in Gitora. You can manage every table’s DDL in Git repos along with its constraints and indexes, in its own file with its complete history, automatically.

No-login Development Experience

Previously, signing in to Gitora required an extra step for database developers. Every time they opened a database session, they had to execute one line of code to sign in to Gitora. Gitora 5 can be configured to recognize selected database users as valid Gitora users. This way, Gitora 5 becomes completely transparent during regular development activities.

A Comprehensive Developer Privileges Management Module

Gitora 5 Enterprise comes with a sophisticated authorization module with which you can manage who can edit which database object and perform which Git operation. You can define privileges for actions such as check out, commit, pull, push etc… at database level and at repo level. You can even restrict access to certain objects to specific developers.

Full API To Completely Automate Your Workflow

Last but not least, Gitora 5 Enterprise comes with a set of API’s so that you can fully automate your workflow. The API’s are easy to use and support the restrictions you specify in the authorization module.

These are our top six features but there are many more. Here is just a few of them:

  • A new and improved diff screen
  • A new way to track every DDL you execute in the database
  • Table DDL generation that is master-detail relationship aware
  • Support for sequences, materialized views

Gitora 5 comes with the features you are already familiar with:

  • Create Git repos with any of your database code objects such as Packages, Views, Types, Triggers etc…
  • Gitora doesn’t miss a change. Capture every change in these objects automatically and commit them to Git with a single click.
  • Perform Git operations such as reset, branch, merge, pull etc.. These operations will update your database objects automatically.
  • Push your repos to any cloud service such as GitHub, GitLab etc…

Gitora is a unique tool that integrates Git to the Oracle Database. It enables you to use Git just like a Java, JavaScript or C# developer.  

Gitora 5 is by far our biggest and most important release since releasing the first version of Gitora in 2015. Gitora 5 is an indispensable tool to improve developer productivity, implement modern development workflows and cut delivery times significantly.

Try Gitora 5 today.

How to Pull/Push using Gitora

Gitora enables Oracle developers to pull code from other databases managed by Gitora with a single click. It also enables them to push to and pull from other Git repositories including the ones hosted by GitHub, GitLab, Bitbucket etc…

Below are the steps to achieve this:

Moving Code from one Database to Another Using Gitora

Gitora 5 can manage any number of databases. It also enables these databases to pull code from each other. This makes moving code in your delivery pipeline (from dev to test, from test to preprod etc…) much less error prone and easier.

Open the Gitora app. Select the repo you want to pull to from the main select box.

In order pull code from another database managed by Gitora, click the “Git->Other Databases -> Pull” menu item. The Pull Dialog shows up.

Select the database you want to pull from. Next choose a repo and the branch.

In the example above, we are connected to our TEST database. We are pulling from the DEV database the MyNewRepo repo’s master branch. Any code changes that exist in the database objects that are part of MyNewRepo’s master branch (but don’t exist in TEST) will move to the TEST database after clicking the Pull button.

Pull is the simplest and most common use case. It moves the latest version of a code base from one database to another. Gitora also supports more sophisticated workflows. For example, you can move the code at a specific commit ID on a specific branch from one database to another database.

To achieve this click “Git->Other Databases->Fetch and Merge” menu item. The Fetch and Merge Dialog shows up. To further extend the example above, using this dialog, you can specify which commit ID you want to fetch from the other database. The example below fetches and earlier commit ID from the MyNewRepo’s master branch in DEV. (Pull always fetches the current code in the DEV database.)

Finally, we may want to fetch a new branch in another database that does not exist in the database we are connected to. For example, we may want to test a new feature developed in the feature branch FEATURE1. To test this feature, we need to pull it to the TEST database. To achieve this, click “Git->Other Databases-> Switch to Branch in Another Database” menu item. A Dailog shows up. Enter the database, repo and the branch name you want to bring over to the database you are connected to. In the example above, we are brining the FEATURE1 branch from MyNewRepo in DEV to the TEST database.

Pull from/Push to Remote Repos

In the Gitora web application, click the Settings –> Manage Remote Repos from the menubar.

The Manage Remote Repos page shows up.

Remote Git Repositories Dialog

Click the add button. The Add Remote dialog shows up. Enter a friendly alias for the remote Git repo. Finally, enter the URL that points to the remote repo. If you are using a service like GitHub, refer to the service provider website for the correct URL. For GitHub, the URL is in the following format: https://github.com/[github user name]/[gitreponame].git

Moving Code from Remote Repos to Databases using Gitora

Pulling from remote repos work the same way as pulling from other databases. Please note that in order for Gitora to successfully pull from a remote repo and update the database the structure, the remote repo must be either created by Gitora initially or the structure, folder and file names of the repo must be as if they are created by Gitora.

Pushing to a remote Git Repo

Open the Gitora app, select the repo you’d like to push from the main select box. Netx, click Git->Remote->Push. The Push dialog shows up.

The Push Dialog

Select the branch you’d like to push and the target remote repository you’d like to push this branch to. Enter the user name and password to connect to the remote repository. Leave these fields empty if the remote repository is not protected by a user name and a password. For example, if you are pushing to GitHub, the credentials you should enter are your GitHub user name and password.

Click the push button and wait for the response message to show up.