Introducing Gitora 3, version control for the Oracle Database

Today, we’re happy to announce the general availability of Gitora 3.

Gitora 2 enabled developers to manage database objects that support the CREATE OR REPLACE command, namely PACKAGES, PROCEDURES, FUNCTIONS, TRIGGERS, VIEWS, SYNONYMS and TYPES in a Git repository. (In Gitora terminology, we call these “Soft Objects”).

Gitora 3 goes a step further and enables developers to manage every database object in an Oracle Database with Git even if the object does not support the CREATE OR REPLACE command. (In Gitora terminology, we call these “Hard Objects”.)

Specifically, Gitora 3 allows developers to manage TABLES, INDEXES, SEQUENCES, CONSTRAINTS, TABLESPACES, MATERIALIZED VIEWS and every other schema or non-schema objects with Git.

Let’s examine how you can manage these objects with Gitora 3 with an example.

Introducing Managed Schemas

Gitora 3 introduces the concept of a Managed Schema. A managed schema is an Oracle Database Schema that Gitora tracks for execution of Hard Object DDL’s. In other words, you register one or more Oracle Schemas to a Gitora repository. Once a schema is registered to a repository, Gitora will track every hard object DDL executed for that schema. A repository can manage many schemas but a schema can only be managed by one repository.

Adding A Managed Schema to a Gitora Repository

In the Gitora App, select a repository. Click Local Commands –> Add/Remove Managed Schemas menu option. A dialog shows up.
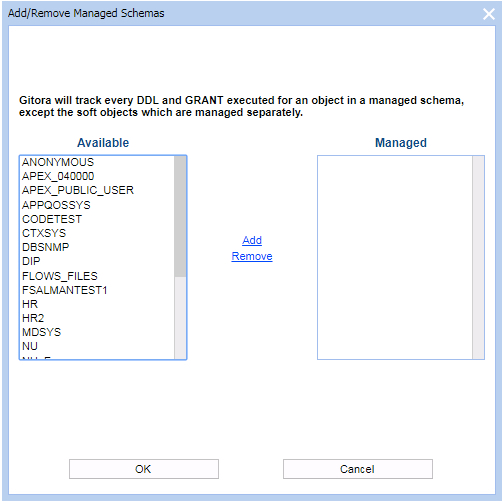
Select the schema(s) you’d like to manage.
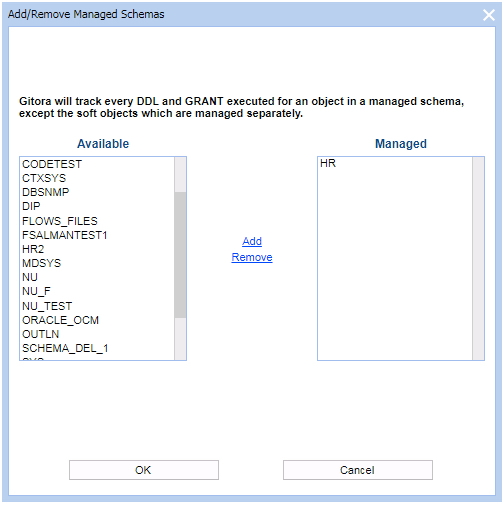
Click OK. The dialog closes. The screenshots above show the HR schema being added to a repo as a managed schema.

The Model Package

After a schema becomes managed, Gitora creates a new package in the schema automatically. This package is always called GITORA_MODEL[X] where [X] is a unique number that identifies the package. In our example above, Gitora created the GITORA_MODEL1 package in the HR schema and added this package to the Git repository which is managing the HR schema:
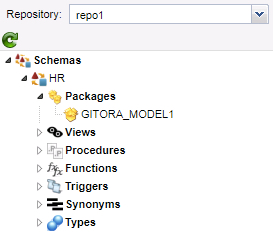
The screenshot above tells us that repo1 is managing the HR schema.

Tracking Soft Objects

There are no changes in Gitora 3 for soft objects. You continue managing soft objects just like you’ve been managing them with Gitora 2. In other words, any repo can manage any number of soft objects and any number of schemas.

To demonstrate this let’s add a dummy package called PACKAGE1 to HR and manage it with the same repo named repo1:

Select Local Commands –> Add/Remove Soft Objects menu item. A dialog shows up where you can select which soft objects you’d like to manage with repo1. Note that, GITORA_MODEL1 package shows up as a managed package because it was automatically created to manage the hard objects in the HR schema. 
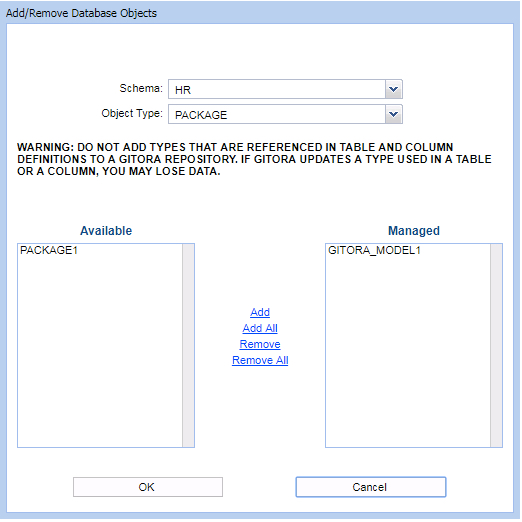
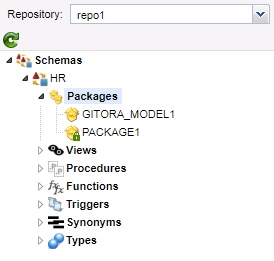
Add PACKAGE1 as a managed package and click OK. The Gitora App shows the following object list for repo1:
Tracking Hard Object DDL’s

Let’s execute the following DDL statements for the HR schema: (Note that in the database session we first have to log in to Gitora with a valid Gitora user. In this case, we logged in as admin.)

[sql]
ALTER TABLE COUNTRIES MODIFY (COUNTRY_NAME VARCHAR2 (200))

ALTER TABLE EMPLOYEES ADD (MIDDLE_NAME VARCHAR2 (25))

ALTER TABLE COUNTRIES ADD (CURRENCY_NAME VARCHAR2 (200))
[/sql]

Finally, let’s also modify a soft object and add a new dummy function to PACKAGE1 called function1.

To commit our changes, let’s switch to Gitora App and click the commit button. The My Objects Dialog shows up, displaying the list of soft objects and hard object DDL’s ready to be committed to Git. Note that the dialog only shows the changes made by the signed in developer:
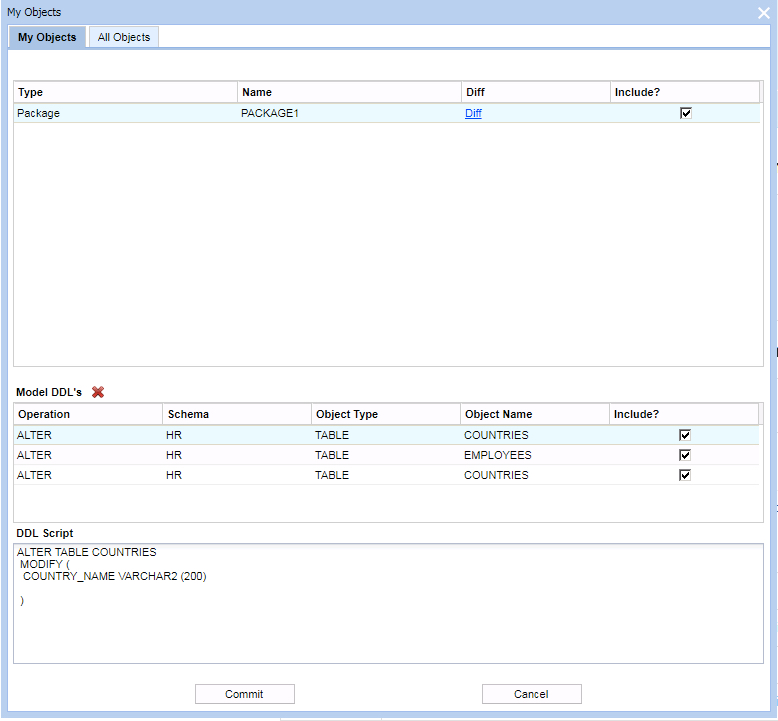
In this dialog, you can choose which packages or hard object DDL’s you’d like to include in this commit by checking/unchecking the checkbox in the Include? columns of both grids.

Note that, the commit registers the package update and the table DDL statement as a single logical commit which is a key benefit we’d like to get from the version control system.

After the commit, we receive the following message from Git:
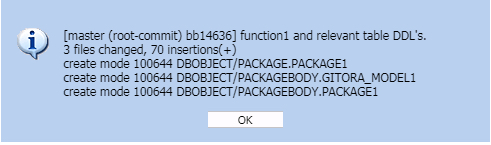
Note that, the Git commit not only included PACKAGE1 but also the GITORA_MODEL1 package. After the Git commit is successful, the new GITORA_MODEL1 package code looks like this:

[sql]
CREATE OR REPLACE
PACKAGE BODY gitora_model1 IS

function doModel return clob is
v_log_cl clob;
v_ddl_cl clob;
v_cursor_int integer;
return_value integer;
procedure log(in_text_cl clob) is
begin
v_log_cl:=v_log_cl||in_text_cl||chr(10);
end;
begin
/*GITORA GENERATED COMMENT. DO NOT EDIT OR REMOVE. ONLY WRITE CODE UNDER THIS LINE.*/
null;

/*SCRIPT FOR HR.COUNTRIES by user:admin */
begin
v_ddl_cl:=’ALTER TABLE COUNTRIES
MODIFY (
COUNTRY_NAME VARCHAR2 (200)

)
‘;
log(v_ddl_cl);
execute immediate v_ddl_cl;
log(‘DDL executed successfully.’);
exception
when others then
log(‘ERROR:’||’ ‘||SQLErrm||’ ‘||dbms_utility.format_error_backtrace);
end;

/*SCRIPT FOR HR.EMPLOYEES by user:admin */
begin
v_ddl_cl:=’ALTER TABLE EMPLOYEES
ADD (
MIDDLE_NAME VARCHAR2 (25)
)
‘;
log(v_ddl_cl);
execute immediate v_ddl_cl;
log(‘DDL executed successfully.’);
exception
when others then
log(‘ERROR:’||’ ‘||SQLErrm||’ ‘||dbms_utility.format_error_backtrace);
end;

/*SCRIPT FOR HR.COUNTRIES by user:admin */
begin
v_ddl_cl:=’ALTER TABLE COUNTRIES
ADD (
CURRENCY_NAME VARCHAR2 (200)
)
‘;
log(v_ddl_cl);
execute immediate v_ddl_cl;
log(‘DDL executed successfully.’);
exception
when others then
log(‘ERROR:’||’ ‘||SQLErrm||’ ‘||dbms_utility.format_error_backtrace);
end;
/*GITORA GENERATED COMMENT. DO NOT EDIT OR REMOVE. ONLY WRITE CODE ABOVE THIS LINE.*/
return v_log_cl;
end;
end;
[/sql]

The GITORA_MODEL Package

The GITORA_MODEL packages contain the DDL statements you commit to your Git repository for the schema they are in. You can edit them any way you’d like to change the DDL statements, call other functions and procedures etc… In other words, they are no different than any other package you are managing with Gitora.

GITORA_MODEL.doModel function executes the DDL statements stored in the package. You can use the doModel function to execute the changes in a target database. For example, after development is completed for a new version, you can pull the new version to from DEV to the TEST database and simply execute the GITORA_MODEL.doModel function to transfer the hard object updates to TEST.

Errors during its execution does not prevent the doModel function from executing remaning DDL statements. The function captures these errors and returns them as a CLOB value. This way, the same GITORA_MODEL package can be executed many times even if contains DDL statements that are previously executed in the target database (because these statements will silently fail). The GITORA_MODEL packages requires minimal maintanance, if any at all.

Non-Schema Objects and GRANTS

Not every database object has a schema. For example, TABLESPACES do not have an owner schema. DDL statements for non-schema objects are tracked by Gitora if the Oracle User(schema) who executed the statement is being managed by Gitora. For example, in the case above, if a DDL statement to create a TABLESPACE is executed by the Oracle User HR, then this DDL will be tracked by repo1.

Similarly, any GRANT and REVOKE statement will be tracked by the Gitora repo which is managing the Oracle User(schema).

Customization

You may not want to manage every object or object type with Gitora. Moreover, you may want to define complex rules to decide which object is managed by which repo. Customizing what types of objects Gitora should manage and in which repo is very easy using PL/SQL. Gitora uses four database level DDL triggers to detect DDL statement execution. By editing these triggers, you can define any kind of rule you like.

For example, a common rule used by Gitora customers is to allow developers to create tables for testing purposes. These tables do not need to be managed by Gitora. One of the easy ways of implementing this rule is to tell developers to use a certain prefix such as Z_ for test tables, and exclude any table DDL statement from executing Gitora API’s in the four DDL triggers if the table name starts with Z_.

Existing Customers

Gitora 3 is a free upgrade for all current customers. Please allow us 2-3 weeks to send us your new license scripts.

We’ll have more tutorials and webinars about Gitora 3 in the near future. Now download the Gitora 3 trial and start playing! 🙂
Agile Development with Oracle PL/SQL

This articles is about agile development using multiple (pluggable) databases. If you are trying to implement an agile workflow using a single database please read this article.

Here is the number one question we receive from PL/SQL developers, DBA’s and IT managers who are implementing a version control solution for their Oracle Database:

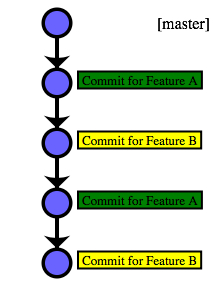
Developer 1 (or Team 1) works on Feature A (or issue A, bug A, project A). Developer 2 works on Feature B. Both developers make many changes to the PL/SQL code and many commits to the version control repository. We move to testing. Based on the test results, even more commits are made by both developers. Now at the last minute, due to some reason we decide to ship Feature B only. How can we remove Feature A from the source code easily? How does Gitora help in such a situation?

There are multiple answers to this question. Below, I’ll go over two possible solutions for two potential setups:

  1. If you are using one shared development database
  2. If you are using multiple development databases (or at least you are open to the idea.)

If You Are Using One Shared Development Database

Let’s assume that our shared development database is called DEV. In other words, both Feature A and Feature B are being developed in the same code base. Let’s also assume our only test database is called TEST.

Finally, assume that DEV and TEST are managed by Gitora. All version control operations are done with Gitora.

In this case, the commit history of the DEV repo has changes both for Feature A and B in a random order and looks something like this:

There is no easy way to remove the commits for Feature B in this setup. If the team decides to deliver Feature A to production but postpone the delivery of Feature B here are the steps they should follow:

  • Go over the commit history of the DEV repo and find the commits that are related to Feature A.
  • Comment out/revert back/change the edits made for Feature A. Git will help the developers to see what’s changed, added, deleted and what the previous versions of code objects looked like.
  • Commit these new changes to the DEV repo.

At this point the commit history in the DEV repo looks something like this:

And finally, the next steps are:

  • Pull the new version from DEV to TEST.
  • Run tests on the TEST database. If there are no errors, deliver the new version to production. If there are errors, go to the second step, wash, rinse and repeat until the desired outcome is reached.

In such a setup Gitora provides the following benefits:

  • Gitora keeps track of all changes made to the PL/SQL code in the DEV database, automatically. Developers do not have to remember which PL/SQL objects they modified and what they modified in those objects.
  • Moving the code between DEV and TEST is as easy as clicking a button. The team does not need to manually prepare scripts.

The downside of this approach is that it involves manual work which is error prone. Developers still have to manually go through the commit history and make the changes to the source code in DEV to disable/remove Feature A. With only one shared development database, there is no easy way to remove Feature A.

If You Are Using Multiple Development Databases

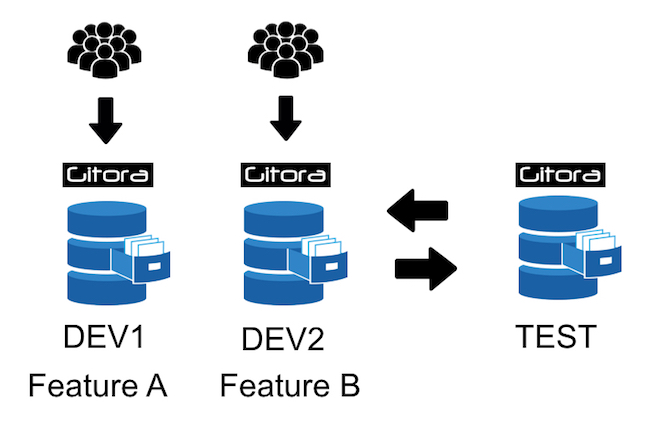
Now things get more interesting. Below is a simplified workflow that uses only two development databases. This setup enables the IT team to deliver only the Feature B without manually editing PL/SQL code objects to remove Feature A.

Here is our initial set up:

  • Developer 1 works in the database DEV1 and Developer 2 works in the database DEV2 i.e. both developers (teams) have their own private environment while they are developing their respective features.
  • Our only test database is called TEST.
  • All databases are managed by Gitora and all Git command are executed using Gitora.
  • DEV1, DEV2 and TEST start with the same version of the code which is stored in the master branch of their respective Git repositories. (In other words, DEV1/master and DEV2/master are clones of TEST/master)

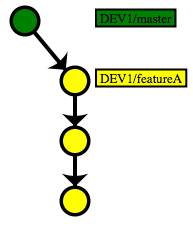
Developer 1:

  • Create a new branch named featureA (DEV1/featureA). Switch DEV1 to use this new branch.
  • Write code in DEV1
  • Commit code changes to the DEV1/featureA. Go back to step 2 as many times as needed.

As an example, the Git history in Gitora DEV1 looks like this:

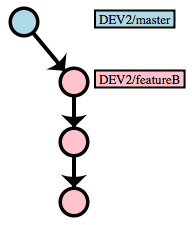
Developer 2:

  • Create a new branch named featureB (DEV2/featureB). Switch DEV2 to use this new branch.
  • Write code in DEV2
  • Commit code changes to the repository to DEV2/featureB (using Gitora DEV2). Go back to step 2 as many times as needed.

The Git commit history in Gitora DEV2 looks like this:

Moving Code Between Databases

At any point in time, if Developer 1 or Developer 2 decides to send code to TEST (for example, for integration testing purposes..), they follow the steps below.

Please note that in real world development, the workflows described below can be performed simultaneously in DEV1 and DEV2, in no particular order, any number of times until both features are ready to be deployed to production.

The steps below are merely a simplified example of how this workflow takes place.

Developer 1:

  • In our example , we assume that Developer 1 is the first developer sending her commits to TEST.
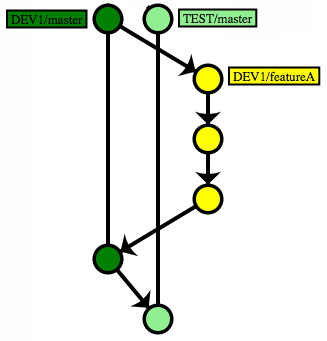
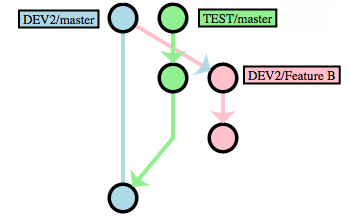
  • Merge DEV1/featureA to DEV1/master. (DEV1/featureA –> DEV1/master). After the merge, commit history for DEV1 looks like this:
  • Pull master branch from DEV1 to TEST. (DEV1/master –> TEST/master). A “Pull” is simply a two step process of fetching a branch from a remote Git repository and then merging it to a local branch. In our example TEST fetches DEV1/master from DEV1 and merges it to TEST/master which we simply show as DEV1/master –> TEST/master.

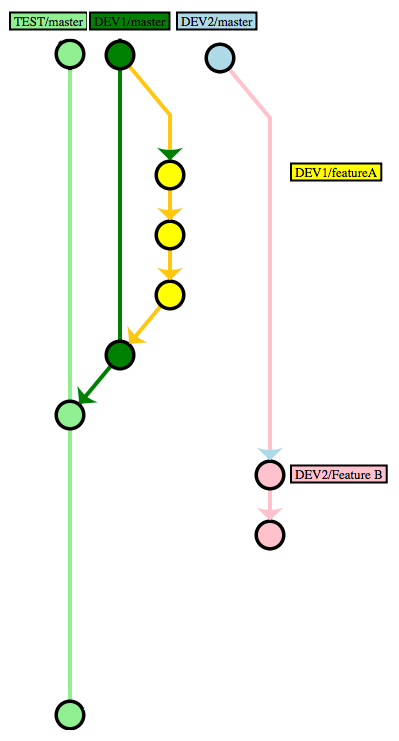
    After the pull, commit history of both TEST and DEV1 looks like this:

Developer 2:

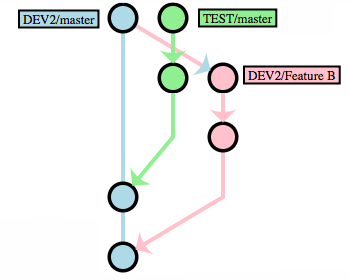
  • Pull master branch from TEST to the master branch in DEV2. (TEST/master –> DEV2/master). (In our example, this is necessary, because TEST/master has received new commits from DEV1/master.) After the pull, the commit history looks like this: (Remember, previously we pulled commits from DEV1/master to TEST/master and we also made commits to DEV2/featureB)
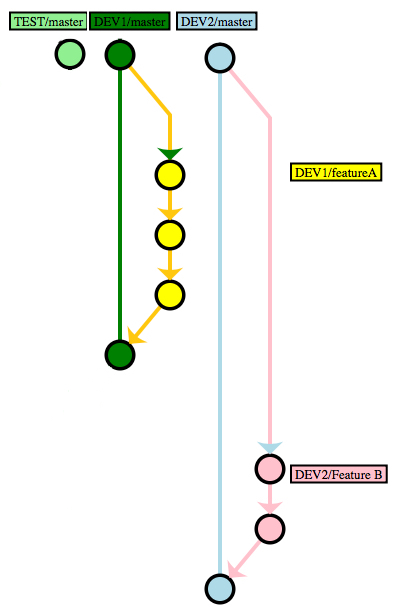
  • Merge DEV2/featureB to DEV2/master. (DEV2/featureB –> DEV2/master) After the merge, the commit history looks like this:
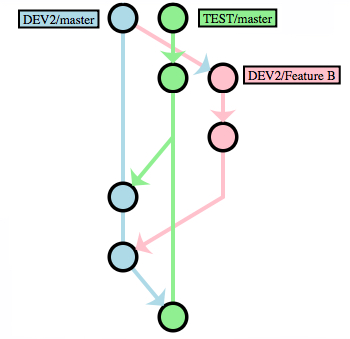
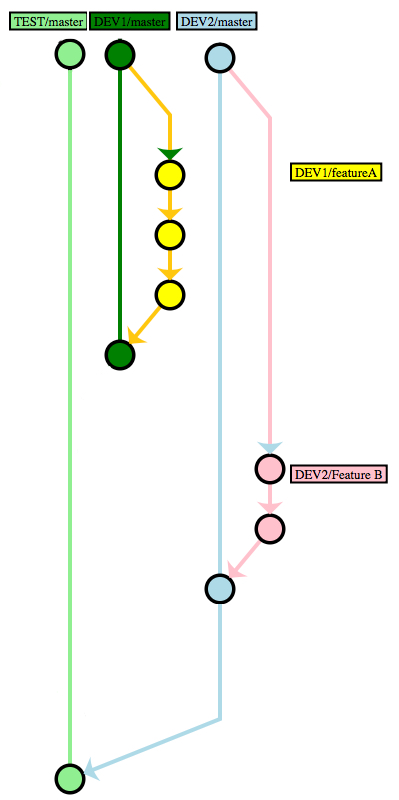
  • Pull master branch from DEV2 to TEST. (DEV2/master –> TEST/master). After the pull, the commit history looks like this:

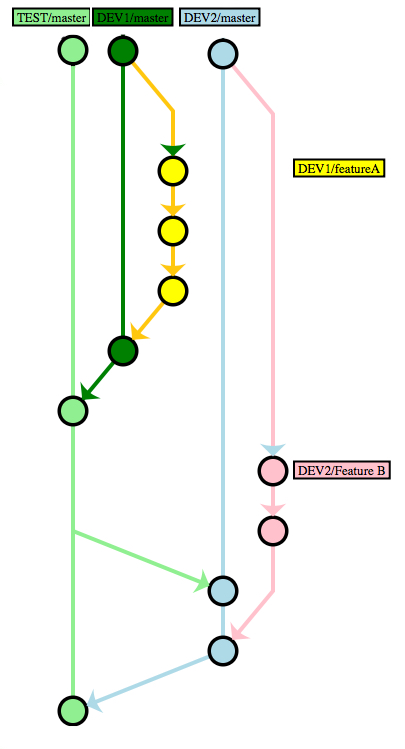
In other words, in its final state, the source code in the TEST database is a merge of Feature A and B where the commits in TEST/master branch are combined. In our example, the full commit history of DEV1, DEV2 and TEST repositories look like this:

Note that at all times, DEV1/featureA only contains the code for Feature A. Similarly, DEV2/featureB only contains the code for Feature B.

This workflow enables the IT team to exclude Feature A from the next deployment at any point in time before going to production.

Removing Feature A from the Deployment

To achieve this in our example, follow the steps below:

  • Revert DEV2/master back to its initial state where no code for Feature B has been committed yet. (This uses the Git reset command.)
  • Merge DEV2/featureB to DEV2/master. (DEV2/featureB –> DEV2/master)
  • Reset TEST/master to its original state.
  • Finally, pull the master branch of DEV2 to the master branch of TEST. (DEV2/master –> TEST/master)

After these steps are completed, the TEST database only contains code changes related to Feature B. We can use Gitora to extract a DDL script which contains only the changes made between the initial and final state of TEST/master and use this script to deploy the new version which only includes Feature B to the production database.

Gitora helps developers execute this workflow with a point&click GUI. Specifically:

  • Gitora keeps track of all changes made to the PL/SQL code in DEV1, DEV2 and TEST automatically.
  • Gitora updates the source code in the Oracle Database automatically when the executed Git command changes the files in the working directory.

Therefore:

  • Developers don’t have to remember which PL/SQL objects they modified and what they modified in those objects.
  • Moving the code between DEV1, DEV2 and TEST is as easy as clicking a button. The team does not need to manually prepare scripts. Gitora can either generate the scripts or update the databases automatically.
  • Crucially, Gitora enables Developer 1 and Developer 2 to switch between code branches automatically. (For example if the DEV1 database switches from featureA branch to the master branch, Gitora automatically updates the code in the DEV1 database to reflect this change.)

Download Gitora now and try this workflow in your environment.

ODTUG Webinar about Version Control for PL/SQL

This week I hosted a webinar for ODTUG members about how to implement a version control solution for the Oracle Database using Git. Many thanks to the 119 attendees who joined the live event. I am very happy to see that version control is now being recognized as a serious pain point among Oracle Database customers.

Please see below for the video and the slides of the presentation:

Webinar Video and Slides

Last week, we hosted another webinar to talk about Gitora and how it helps Oracle developers manage their PL/SQL code base. Below are the slides we used during the webinar:

You can watch the recording of the webinar below:

Gitora in 30 Minutes

Gitora is the version control tool for PL/SQL. It hooks Git to the Oracle Database and enables you to manage your PL/SQL code base easily. Below is a 30 minute demo video which explains the benefits of Gitora and how it works.