This articles is about agile development using multiple (pluggable) databases. If you are trying to implement an agile workflow using a single database please read this article.
Here is the number one question we receive from PL/SQL developers, DBA’s and IT managers who are implementing a version control solution for their Oracle Database:
Developer 1 (or Team 1) works on Feature A (or issue A, bug A, project A). Developer 2 works on Feature B. Both developers make many changes to the PL/SQL code and many commits to the version control repository. We move to testing. Based on the test results, even more commits are made by both developers. Now at the last minute, due to some reason we decide to ship Feature B only. How can we remove Feature A from the source code easily? How does Gitora help in such a situation?
There are multiple answers to this question. Below, I’ll go over two possible solutions for two potential setups:
- If you are using one shared development database
- If you are using multiple development databases (or at least you are open to the idea.)
If You Are Using One Shared Development Database
Let’s assume that our shared development database is called DEV. In other words, both Feature A and Feature B are being developed in the same code base. Let’s also assume our only test database is called TEST.
Finally, assume that DEV and TEST are managed by Gitora. All version control operations are done with Gitora.
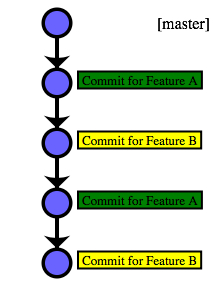
In this case, the commit history of the DEV repo has changes both for Feature A and B in a random order and looks something like this:
There is no easy way to remove the commits for Feature B in this setup. If the team decides to deliver Feature A to production but postpone the delivery of Feature B here are the steps they should follow:
- Go over the commit history of the DEV repo and find the commits that are related to Feature A.
- Comment out/revert back/change the edits made for Feature A. Git will help the developers to see what’s changed, added, deleted and what the previous versions of code objects looked like.
- Commit these new changes to the DEV repo.
At this point the commit history in the DEV repo looks something like this:
And finally, the next steps are:
- Pull the new version from DEV to TEST.
- Run tests on the TEST database. If there are no errors, deliver the new version to production. If there are errors, go to the second step, wash, rinse and repeat until the desired outcome is reached.
In such a setup Gitora provides the following benefits:
- Gitora keeps track of all changes made to the PL/SQL code in the DEV database, automatically. Developers do not have to remember which PL/SQL objects they modified and what they modified in those objects.
- Moving the code between DEV and TEST is as easy as clicking a button. The team does not need to manually prepare scripts.
The downside of this approach is that it involves manual work which is error prone. Developers still have to manually go through the commit history and make the changes to the source code in DEV to disable/remove Feature A. With only one shared development database, there is no easy way to remove Feature A.
If You Are Using Multiple Development Databases
Now things get more interesting. Below is a simplified workflow that uses only two development databases. This setup enables the IT team to deliver only the Feature B without manually editing PL/SQL code objects to remove Feature A.
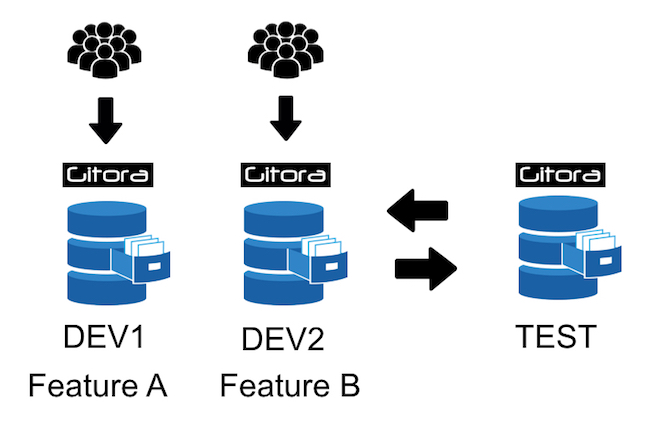
Here is our initial set up:
- Developer 1 works in the database DEV1 and Developer 2 works in the database DEV2 i.e. both developers (teams) have their own private environment while they are developing their respective features.
- Our only test database is called TEST.
- All databases are managed by Gitora and all Git command are executed using Gitora.
- DEV1, DEV2 and TEST start with the same version of the code which is stored in the master branch of their respective Git repositories. (In other words, DEV1/master and DEV2/master are clones of TEST/master)
Developer 1:
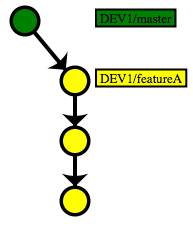
- Create a new branch named featureA (DEV1/featureA). Switch DEV1 to use this new branch.
- Write code in DEV1
- Commit code changes to the DEV1/featureA. Go back to step 2 as many times as needed.
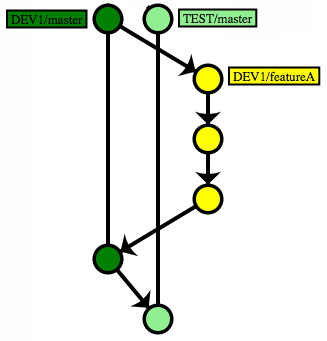
As an example, the Git history in Gitora DEV1 looks like this:
Developer 2:
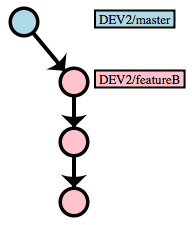
- Create a new branch named featureB (DEV2/featureB). Switch DEV2 to use this new branch.
- Write code in DEV2
- Commit code changes to the repository to DEV2/featureB (using Gitora DEV2). Go back to step 2 as many times as needed.
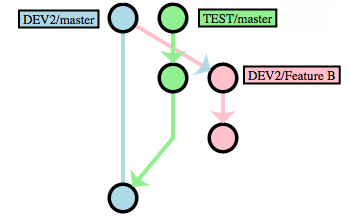
The Git commit history in Gitora DEV2 looks like this:
Moving Code Between Databases
At any point in time, if Developer 1 or Developer 2 decides to send code to TEST (for example, for integration testing purposes..), they follow the steps below.
Please note that in real world development, the workflows described below can be performed simultaneously in DEV1 and DEV2, in no particular order, any number of times until both features are ready to be deployed to production.
The steps below are merely a simplified example of how this workflow takes place.
Developer 1:
- In our example , we assume that Developer 1 is the first developer sending her commits to TEST.
- Merge DEV1/featureA to DEV1/master. (DEV1/featureA –> DEV1/master). After the merge, commit history for DEV1 looks like this:
- Pull master branch from DEV1 to TEST. (DEV1/master –> TEST/master). A “Pull” is simply a two step process of fetching a branch from a remote Git repository and then merging it to a local branch. In our example TEST fetches DEV1/master from DEV1 and merges it to TEST/master which we simply show as DEV1/master –> TEST/master.
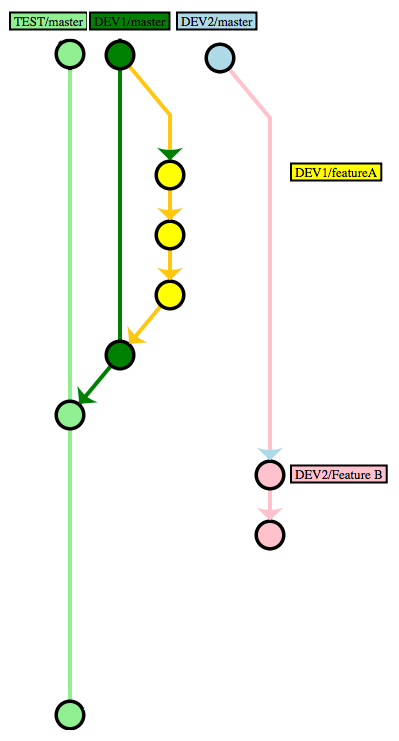
After the pull, commit history of both TEST and DEV1 looks like this:
Developer 2:
- Pull master branch from TEST to the master branch in DEV2. (TEST/master –> DEV2/master). (In our example, this is necessary, because TEST/master has received new commits from DEV1/master.) After the pull, the commit history looks like this: (Remember, previously we pulled commits from DEV1/master to TEST/master and we also made commits to DEV2/featureB)
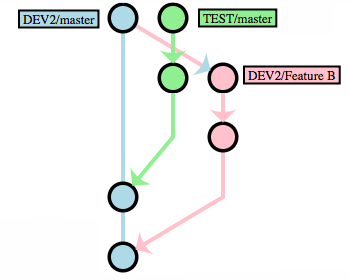
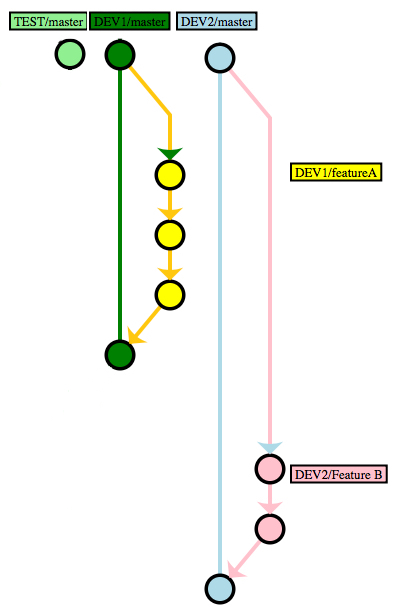
- Merge DEV2/featureB to DEV2/master. (DEV2/featureB –> DEV2/master) After the merge, the commit history looks like this:
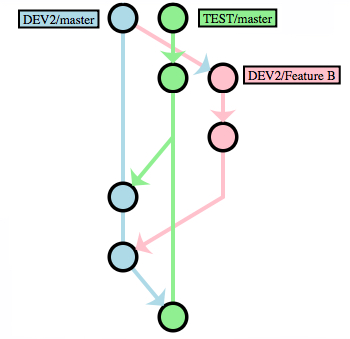
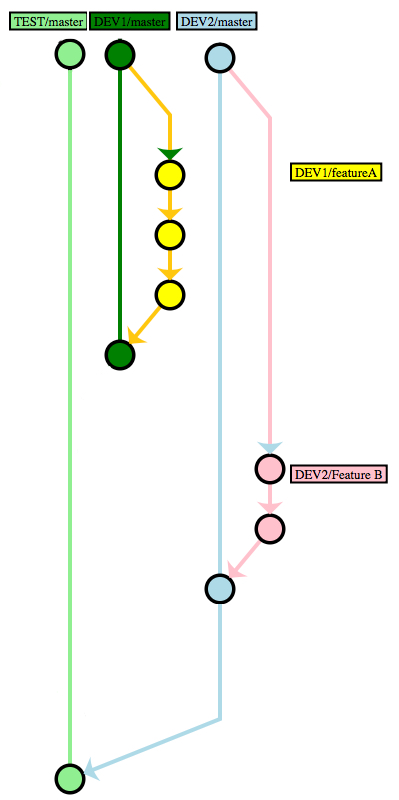
- Pull master branch from DEV2 to TEST. (DEV2/master –> TEST/master). After the pull, the commit history looks like this:
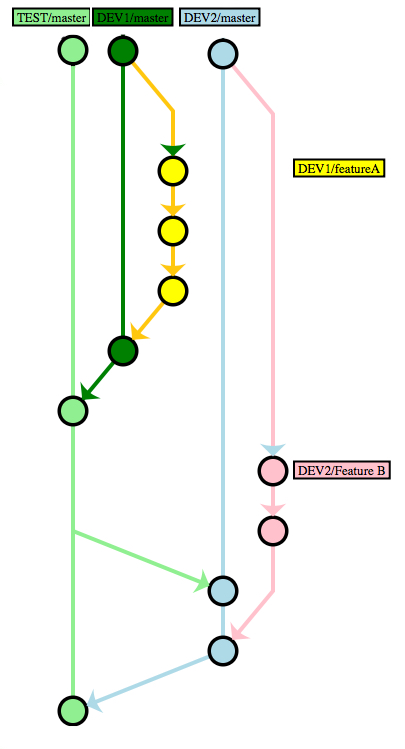
In other words, in its final state, the source code in the TEST database is a merge of Feature A and B where the commits in TEST/master branch are combined. In our example, the full commit history of DEV1, DEV2 and TEST repositories look like this:
Note that at all times, DEV1/featureA only contains the code for Feature A. Similarly, DEV2/featureB only contains the code for Feature B.
This workflow enables the IT team to exclude Feature A from the next deployment at any point in time before going to production.
Removing Feature A from the Deployment
To achieve this in our example, follow the steps below:
- Revert DEV2/master back to its initial state where no code for Feature B has been committed yet. (This uses the Git reset command.)
- Merge DEV2/featureB to DEV2/master. (DEV2/featureB –> DEV2/master)
- Reset TEST/master to its original state.
- Finally, pull the master branch of DEV2 to the master branch of TEST. (DEV2/master –> TEST/master)
After these steps are completed, the TEST database only contains code changes related to Feature B. We can use Gitora to extract a DDL script which contains only the changes made between the initial and final state of TEST/master and use this script to deploy the new version which only includes Feature B to the production database.
Gitora helps developers execute this workflow with a point&click GUI. Specifically:
- Gitora keeps track of all changes made to the PL/SQL code in DEV1, DEV2 and TEST automatically.
- Gitora updates the source code in the Oracle Database automatically when the executed Git command changes the files in the working directory.
Therefore:
- Developers don’t have to remember which PL/SQL objects they modified and what they modified in those objects.
- Moving the code between DEV1, DEV2 and TEST is as easy as clicking a button. The team does not need to manually prepare scripts. Gitora can either generate the scripts or update the databases automatically.
- Crucially, Gitora enables Developer 1 and Developer 2 to switch between code branches automatically. (For example if the DEV1 database switches from featureA branch to the master branch, Gitora automatically updates the code in the DEV1 database to reflect this change.)
Download Gitora now and try this workflow in your environment.
