This article describes how you can track schema changes with a Single Schema Repo (SSR). If you haven’t done so already, we recommend you to read this article first, which explains how Gitora manages tables.
Terminology
In Gitora parlance, any object that can be created with the CREATE OR REPLACE syntax is called a soft object. Objects such as tables, sequences and materialized views which cannot be created with the CREATE OR REPLACE syntax are called hard objects.
Altough one repo can store both hard and soft objects without any issues, we recommend users to store hard and soft objects of a project in separate repos.
Managing Schema Changes with Gitora
Gitora repos can track all changes to hard objects and SSR’s are no different. However, an SSR can only track the hard objects changes in the schema it is associated to.
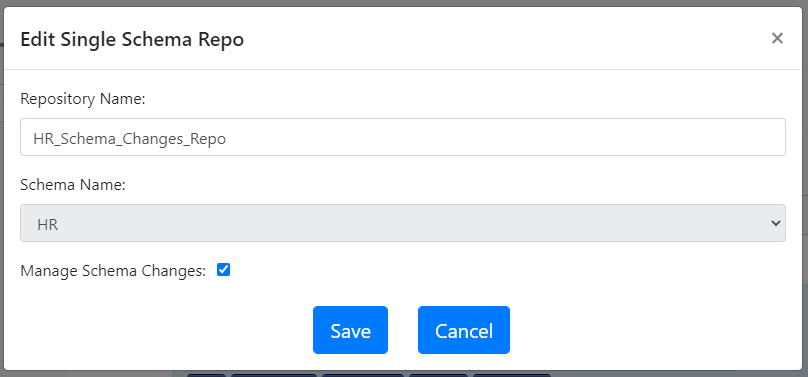
You can enable this feature by checking the Manage Schema Changes checkbox while creating or editing the SRR.
If a schema is managed by a Gitora repo, Gitora will not allow any user to create or edit any hard object in the schema without connecting to Gitora first.
An SSR can only manage the changes in the schema it is associated to.
A schema can only be managed by one repo.
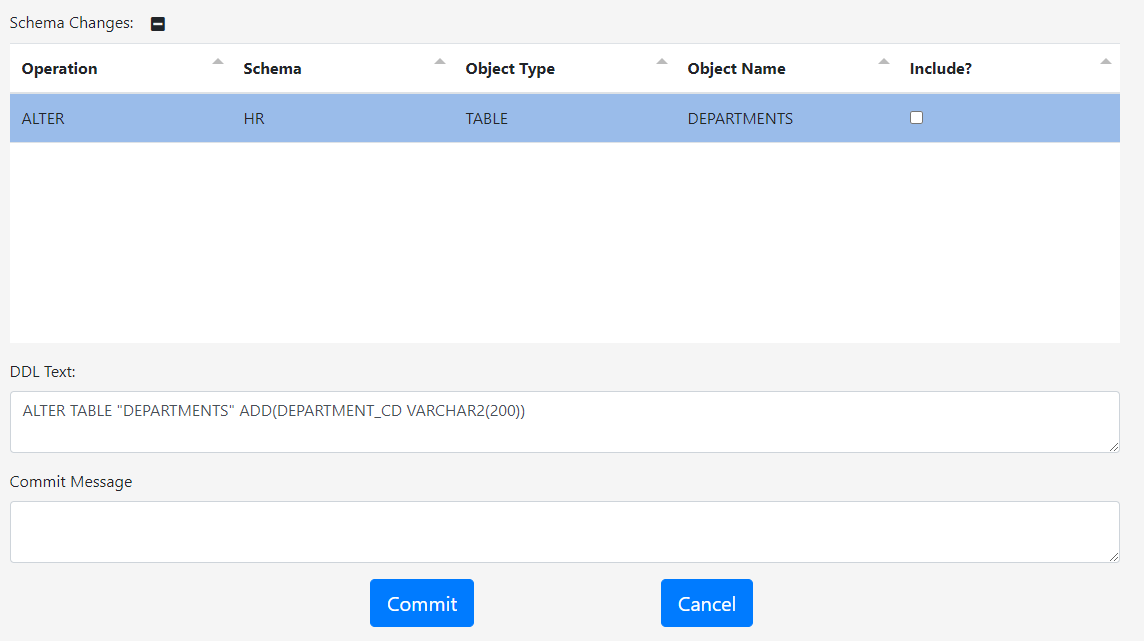
The DDL statements captured by an SSR will be committed to Git without the schema prefixes.
In the example below, we add a column named DEPARTMENT_CD to the HR.DEPARTMENTS table. The DDL statement in Gitora does not have the schema prefix HR.
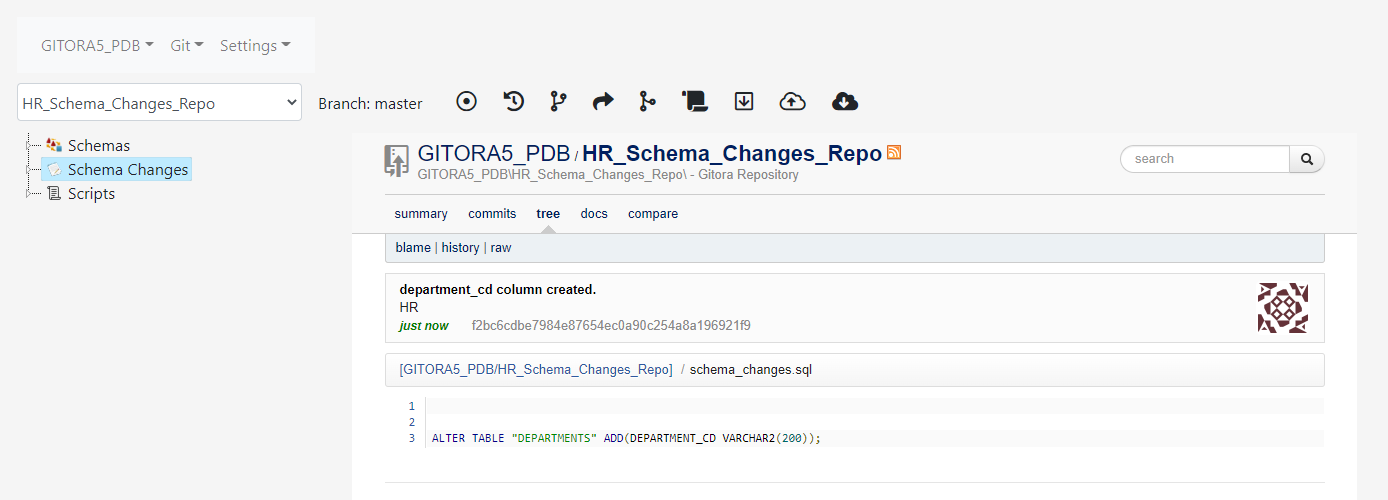
After the commit, the DDL statement shows up in the Git repo. It is appended to the previous list of committed DDL statements. You can access committed DDL statements to Gitora by clicking the Schema Changes tree node:
Moving Hard Object Changes Between Schemas
Single Schema Repos enable developers to move hard object changes among schemas easily. This is best explained with a simplified example. A real world situation will probably be more complex but the principles will remain the same.
Assume that HR is our master schema and HR_HARD_OBJECTS_REPO is the single schema repo where we manage the hard object changes in the HR schema. Further, assume that two developers Joe and Jane are working in the same database but in their own schemas named HR_JOE and HR_JANE respectively. They can manage hard object changes with the following setup:
Create two single schema repos, one for Joe and one for Jane, named HR_JOE_HARD_OBJECTS_REPO and HR_JANE_HARD_OBJECTS_REPO respectively. Associate the HR_JOE_HARD_OBJECTS_REPO with HR_JOE and HR_JANE_HARD_OBJECTS_REPO with HR_JANE. Do NOT check the Manage Schema Changes checkbox for each repo during creation.
Pull from HR_HARD_OBJECTS_REPO to HR_JOE_HARD_OBJECTS_REPO and to HR_JANE_HARD_OBJECTS_REPO.
Open HR_JOE_HARDOBJECTS_REPO in Gitora. From the menu bar, select to Git–>Repo–>Edit Repo menu item and check the Manage Schema Changes checkbox. Repeat this step for HR_JANE_HARDOBJECTS_REPO as well.
Now that our developers’ repos are initialized, they can pull hard object changes from each other’s repos. Not having the schema prefixes in the DDL statements makes executing these DDL statements in their own schema easier.
Obviously, in a real world scenario this flow will be more complex. It will most likely involve pushing to and pulling from repos in GitHub, GitBlit or similar services. Developers may also need to manually edit the document that contains the schema changes.
Fortunately, Gitora works seamlessly with GitHub GitLab and similar services. It also allows developers to edit the schema changes document and commit their changes right within the Gitora app. Finally, after a pull, developers can compare old and new versions of the schema changes document to determine which DDL statements they need to execute in their own schema. This comparison can be done in the Gitora application, as well.
For development teams, Gitora makes managing schema changes much easier. It helps the teams use Git with their code base and implement modern development workflows to increase productivity and stay compliant.
With Gitora 6, developers can work on the same code base (i.e. a package, procedure etc…) in the same database without blocking each other.
Many development teams use a single database for development. Many of them use the same database for testing, as well. They achieve this by using different schemas for different purposes. Gitora 6 enables these teams to create Git repos for these schemas and pull updates between them.
With Gitora 6, you can even create a different schema for every developer and have them merge their code using Git.
Gitora 6 enables you to implement any modern development workflow in a single database.
How does Gitora 6 work?
Gitora 6 introduces a new repo type called Single Schema Repo (SSR). As its name suggests an SSR manages database objects from a single schema. The DDL scripts in SSR’s don’t contain the schema prefixes so that Gitora can execute them in other schemas in the same database.
This enables developers to work on the same package, procedure, function, view etc… (i.e. anything that can be created with the CREATE OR REPLACE command) at the same time, in the same database in different schemas.
An Example
Let’s go through an example: Let’s assume that the team is working on a logistics software and have a schema named LOGISTICS that stores all their database objects. The team can create a schema (or already have one) called LOGISTICS_TEST in the same database. Here are the steps the team needs to follow so that they can pull their changes to LOGISTICS_TEST.
Create a single schema Gitora repo that manages the LOGISTICS schema. Let’s call it the REPO_LOGISTICS.
Add all relevant database objects in the LOGISTICS schema to the LOGISTICS_REPO.
Create another single schema Gitora repo that manages the LOGISTICS_TEST schema. Let’s call it the REPO_LOGISTICS_TEST
Pull from the REPO_LOGISTICS to REPO_LOGISTICS_TEST
That’s it. That’s all there is to it. From this point on, any change you make to the code in the LOGISTICS schema can be pulled to the LOGISTICS_TEST schema using Gitora (and vice versa).
Single Schema Repos can also be used to create separate development environments in the same database for every developer in the team.
Multiple Developers, Same Database
Assuming we already have the LOGISTICS schema and the REPO_LOGISTICS repo from the previous example, here is how that would work:
Create a schema for each developer: LOGISTICS_JOE, LOGISTICS_MARY, LOGISTICS_PAUL.
Create a single schema Gitora repo for each schema. Let’s call them REPO_LOGISTICS_JOE, REPO_LOGISTICS_MARY, REPO_LOGISTICS_PAUL respectively.
Pull from the REPO_LOGISTICS to REPO_LOGISTICS_JOE, REPO_LOGISTICS_MARY and REPO_LOGISTICS_PAUL.
From this point on, all three developers can work in their own schema and edit any package, procedure, view etc… freely, without overwriting each other’s changes or being affected by them. Using Gitora, they can create new branches in their own repo, for features or bugs they work on without affecting anyone else.
When the time comes to put it all together, they can use Gitora to merge their changes.
Before Gitora 6, agile database development with Gitora required multiple databases to implement. With Gitora 6 you can achieve it in a single database.
We are incredibly excited to release Gitora 6. We believe it will bring a massive productivity boost to Oracle database development teams worldwide. We can’t wait for you to try it.
Here is the number one question I receive from PL/SQL developers, DBA’s and IT managers who are implementing a version control solution for their Oracle Database:
Developer 1 (or Team 1) works on Feature A (or issue A, bug A, project A). Developer 2 works on Feature B. Both developers make many changes to the PL/SQL code and many commits to the version control repository. We move to testing. Based on the test results, even more commits are made by both developers. Now at the last minute, due to some reason we decide to ship Feature B only. How can we remove Feature A from the source code easily? How does version control help in such a situation?
There are multiple answers to this question. Below, I’ll go over two possible solutions for two potential setups:
Let’s assume that our development database is called DEV and the shared development schema in DEV is called HR. In other words, both Feature A and Feature B are being developed in the same code base. Let’s also assume that there is no other database for testing. We test in DEV in the schema called HR_TEST.
Assume that HR and HR_TEST schemas are managed by two Gitora single schema repos (SSR) repos named HR_REPO and HR_TEST_REPO, respectively.
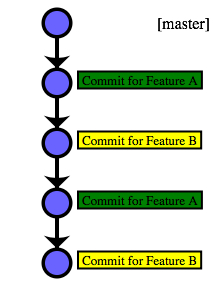
In this case, the commit history in HR_REPO has changes both for Feature A and B in a random order and looks something like this:
There is no easy way to remove the commits for Feature B in this setup. If the team decides to deliver Feature A to production but postpone the delivery of Feature B here are the steps they should follow:
Go over the commit history in HR_REPO and find the commits that are related to Feature A.
Comment out/revert back/change the edits made for Feature A. Git will help the developers to see what’s changed, added, deleted and what the previous versions of code objects looked like.
Commit these new changes to HR_REPO.
At this point the commit history in HR_REPO looks something like this:
And finally, the next steps are:
Pull the new version from HR_REPO to HR_TEST_REPO using Gitora.
Run tests on the HR_TEST schema. If there are no errors, deliver the new version to production. If there are errors, go to the second step, rinse and repeat until the desired outcome is reached.
In such a setup Gitora provides the following benefits:
Gitora keeps track of all changes made to the PL/SQL code in the HR schema, automatically. Developer 2 does not have to remember which PL/SQL objects she modified and what she modified in those objects.
Moving the code between HR and HR_TEST schemas is as easy as clicking a button. The team does not need to manually prepare scripts.
The downside of this approach is that it involves manual work which is error prone. Developer 2 still has to manually go through the commit history and make the changes to the source code in the HR schema to disable/remove Feature A. With only one shared development database ( i.e. development environment), there is no easy way to remove Feature A.
If You Are Using Multiple Development Schemas
Now things get more interesting. Below is a simplified workflow that uses only two development databases. This setup enables the IT team to deliver only Feature B to deployment without manually editing PL/SQL code objects to remove Feature A.
Here is our initial set up:
Developer 1 works in the schema HR_DEV1 schema and Developer 2 works in the HR_DEV2 schema i.e. both developers (teams) have their own private schemas while they are developing their respective features.
Our only test schema is in the same database and is called HR_TEST.
HR_DEV1 is schema managed by Gitora single schema repo DEV1, HR_DEV2 is managed by Gitora SSR DEV2 and the HR_TEST is managed by Gitora SSR TEST.
DEV1, DEV2 and TEST repos start with the same version of the code which is stored in their master branch.(In other words, DEV1/master and DEV2/master are clones of TEST/master)
Obviously, all Git operations mentioned below are executed using Gitora. Gitora takes care of updating the database code after a Git command is executed.
Developer 1:
Using Gitora, create a new branch named featureA (DEV1/featureA). Switch DEV1 to use this new branch.
Write code in DEV1.
Commit code changes to the DEV1/featureA (using Gitora). Go back to step 2 as many times as needed.
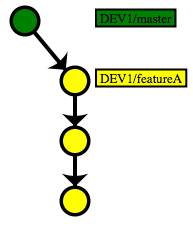
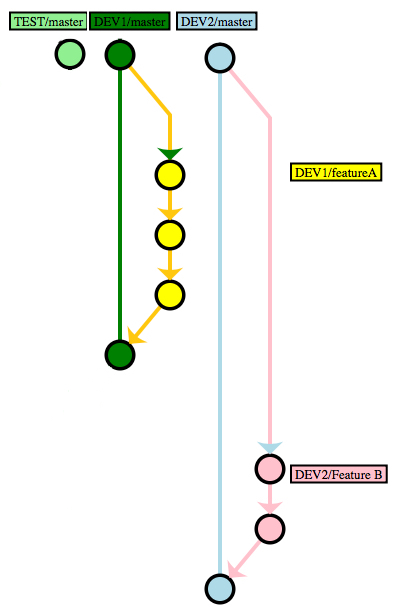
As an example, the commit history of DEV1 looks like this:
Developer 2:
Create new branch named featureB (DEV2/featureB). Switch DEV2 to use this new branch.
Write code in DEV2.
Commit code changes to the repository to DEV2/featureB (using Gitora). Go back to step 2 as many times as needed.
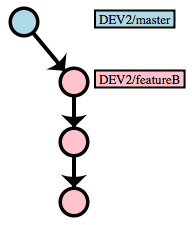
The Git commit history in Gitora DEV2 looks like this:
Moving Code Between Schemas
At any point in time, if Developer 1 or Developer 2 decides to send code to the HR_TEST schema (for example, for integration testing purposes..), they follow the steps below.
Please note that in real world development, the workflows described below can be performed simultaneously in DEV1 and DEV2 repos, in no particular order, any number of times until both features are ready to be deployed to production.
The steps below are merely a simplified example of how this workflow takes place.
Developer 1:
In our example , we assume that Developer 1 is the first developer sending her commits to the HR_TEST schema.
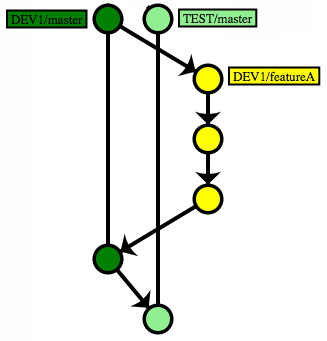
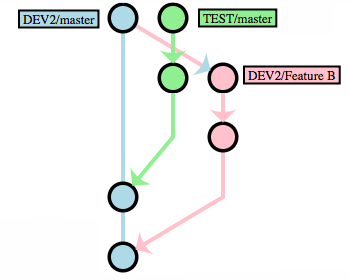
Merge DEV1/featureA to DEV1/master. (DEV1/featureA –> DEV1/master) After the merge, commit history in DEV1 looks like this:
Pull master branch from DEV1 to TEST. (DEV1/master –> TEST/master). A “Pull” is simply a two step process of fetching a branch from a remote Git repository and then merging it to a local branch. In our example TEST fetches DEV1/master from the DEV1 repo and merges it to TEST/master which we simply show as DEV1/master –> TEST/master.
After the pull, commit history of both TEST and DEV1 looks like this:
Developer 2:
Now it is time for Developer 2 to send her changes to the HR_TEST schema. She does the following steps:
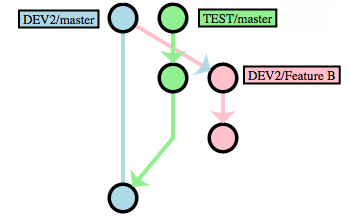
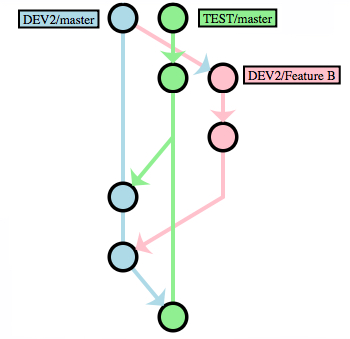
Pull master branch from the TEST repo to the master branch in DEV2. (TEST/master –> DEV2/master). (In our example, this is necessary, because TEST/master has received new commits from DEV1/master.) After the pull, the commit history looks like this: (Remember, previously we pulled commits from DEV1/master to TEST/master and we also made commits to DEV2/featureB)
Merge DEV2/featureB to DEV2/master. (DEV2/featureB –> DEV2/master) After the merge, the commit history looks like this:
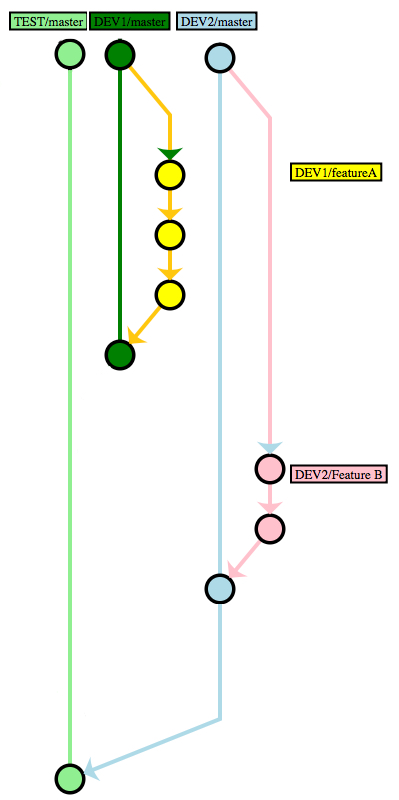
Pull master branch from the DEV2 repo to the TEST repo. (DEV2/master –> TEST/master). After the pull, the commit history looks like this:
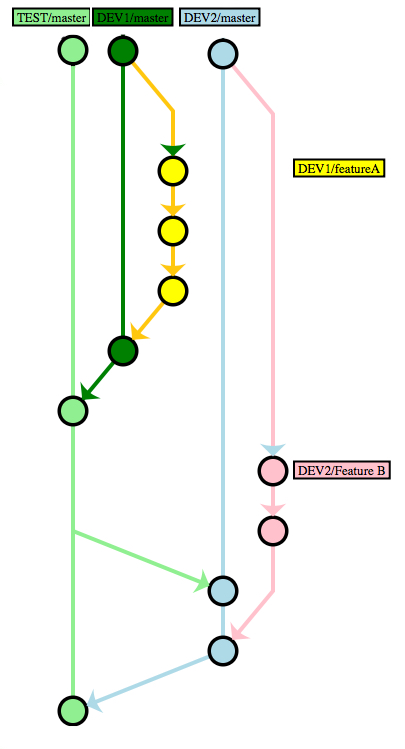
In other words, in its final state, the source code in the HR_TEST schema (and in the TEST repo) is a merge of Feature A and B. In our example, the full commit history of DEV1, DEV2 and TEST repositories look like this:
Note that at all times, DEV1/featureA only contains the code for Feature A. Similarly, DEV2/featureB only contains the code for Feature B.
Removing Feature A from the Deployment
This workflow enables the IT team to exclude Feature A from the next version of the software at any point in time before deploying it to the production environment.
To exclude Feature A from the deployment in the example above, follow the steps below:
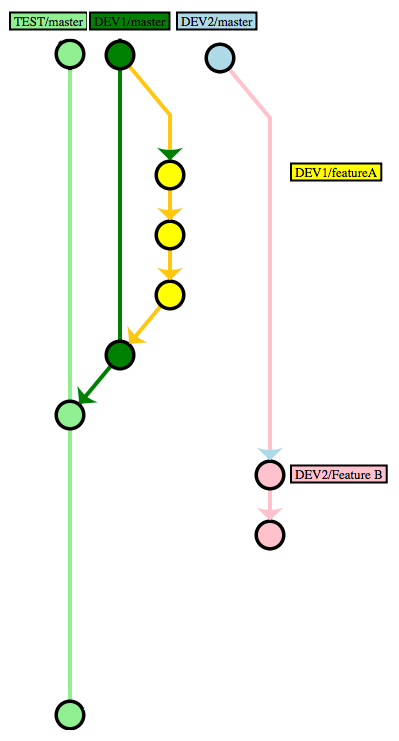
Revert DEV2/master back to its initial state where no code for Feature B has been committed yet. (This uses the Git reset command.)
Merge DEV2/featureB to DEV2/master. (DEV2/featureB –> DEV2/master)
Reset TEST/master to its original state.
Finally, pull master branch of DEV2 to the master branch of TEST. (DEV2/master –> TEST/master)
After these steps are completed, the HR_TEST schema only contains code changes related to Feature B. We can use Gitora to extract a DDL script from HR_TEST which contains only the changes made between the initial and final state of TEST/master and use this script to deploy Feature B to the production environment.
Gitora helps developers execute this workflow with a point&click GUI:
Gitora keeps track of all changes made to the PL/SQL code in HR_DEV1, HR_DEV2 and HR_TEST schemas automatically.
Gitora updates the source code in the Oracle Database automatically when the executed Git command changes the files in a Git working directory.
Therefore:
Developers don’t have to remember which PL/SQL objects they modified and what they modified in those objects.
Moving the code between HR_DEV1, HR_DEV2 and HR_TEST is as easy as clicking a button. The team does not need to manually prepare scripts. Gitora can either generate the scripts or update the databases automatically.
Crucially, Gitora enables Developer 1 and Developer 2 to switch between code branches automatically. (For example if the DEV1 repo switches its active branch from featureA to the master branch, Gitora automatically updates the code in the HR_DEV1 schema to reflect this change.)
Download Gitora now and try this workflow in your environment.
This article shows how you can create a Single Schema Repo (SSR) wit Gitora 6.
Sign in to Gitora. Next click Git –> Repo –> Create Repo –> Single Schema Repo.
The Single Schema Repo Creation Dialog show up.
Enter a unique repo name. (In this example, we’ll call it SSR_1)
Select the schema the SSR is associated to. (In this example it will be associted to the HR schema)
Leave the Manage Schema Changes unchecked for now.
Click save.
The repo SSR_1 is created. SSR_1 can only manage objects that are in the HR schema. (Other than this limitation, the SSR_1 repo works just like any other repo.)
Adding Database Objects To a Single Schema Repo
This process is the same as adding objects to a regular Gitora repo (which is now called a Multi Schema Repo MSR)
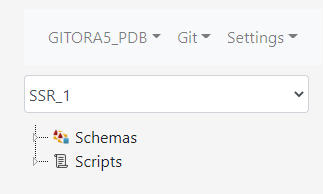
Select the SSR_1 repo from the example above from the combobox if it is not already selected.
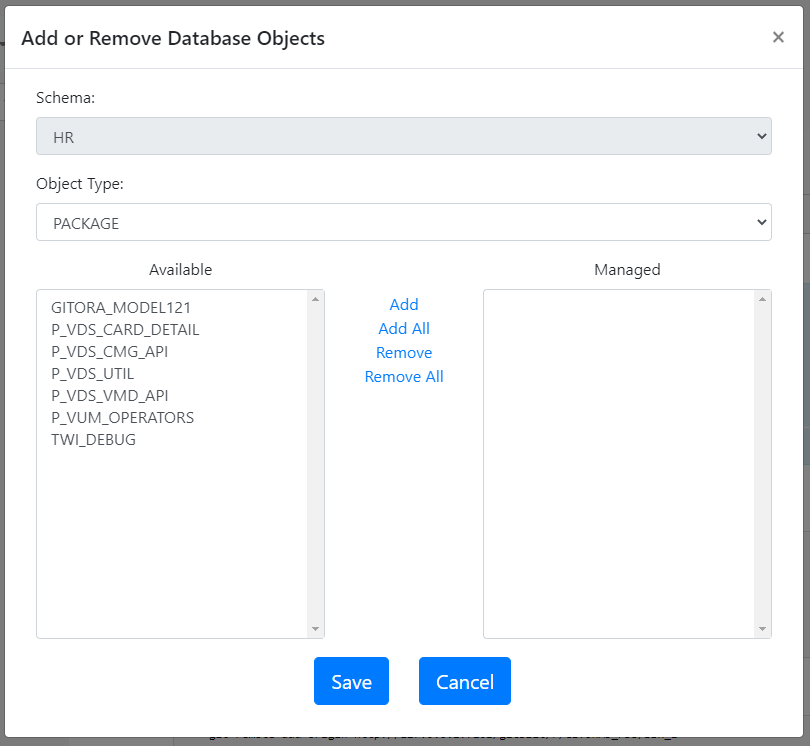
In the menu bar, click to Git –> Add/Remove Objects. The Add or Remove Database Objects Dialog shows up.
Select the database objects you’d like to manage with this repo and click Save. Use the Object Type dropdown to switch between different object types.
Note that the schema dropdown is disabled because we are working with a Single Schema Repo.
These commands work just like they do for regular repos. There are no changes.
Pulling from Other Repos
In Gitora 5, repos could only pull from repos managing objects in other databases. In Gitora 6, single schema repos can also pull from other single schema repos managing objects in the same database.
The example below shows how you can pull from one SSR to another managing objects in the same database. All three pull operations (i.e. Pull, Fetch&Merge, Switch to Branch in Another Repo) work the same way.
Here are the steps to pull from REPO_LOGISTICS to REPO_LOGISTICS_TEST.
Open the REPO_LOGISTICS_TEST repo in Gitora.
From the menu, select Git –> Pull
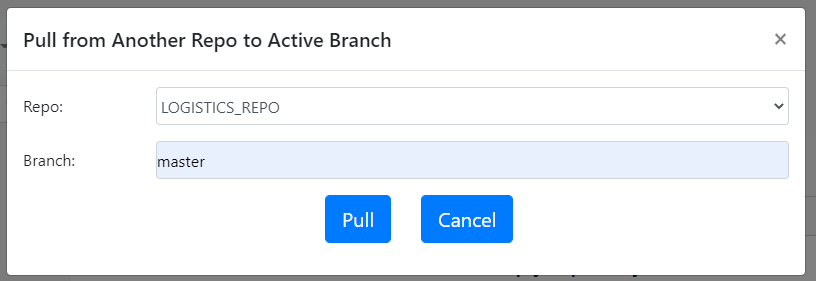
The Pull from Another Repo to Active Branch Dialog shows up.
3. Select the name of the single schema repo you want to pull from. (In our case, it is the LOGISTICS_REPO.)
4. Type the name of the branch you want to pull from.
5. Click the Pull button.
That’s it. All changes in LOGISTICS_REPO are now merged to the LOGISTICS_REPO.
FAQ
Can I create multiple Single Schema Repos that are associated to the same schema?
Yes. You can create multiple SSR’s that are associated to the same schema. This is especially useful in dividing the database objects in the schema into multiple logical groups.
Can Single Schema Repos pull from other databases?
Yes. It works exactly like it does in Gitora 5. In the Gitora app, select Git–>Other Databases–>Pull from the menu bar.
Can I track changes to tables with a Single Schema Repo?